There are many tools to dynamically change the screen in Spring Boot. In this posting, we will explore some of the tools and how to set up and use them.
List of Contents
- General Settings
- Thymeleaf
- JSP
General Settings
Let's add the necessary dependencies first.
Dependencies
Spring Web
Provides the web application development environment
<dependency>
  <groupId>org.springframework.boot</groupId>
  <artifactId>spring-boot-starter-web</artifactId>
</dependency>
Devtools
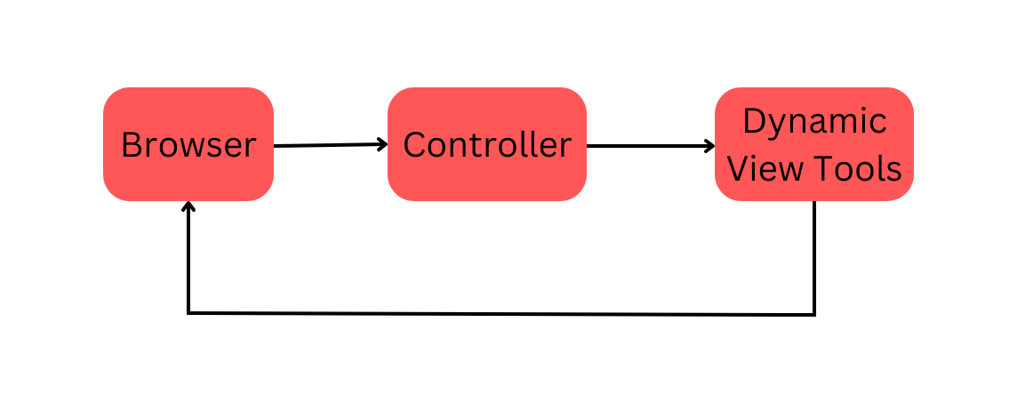
Provides live reloading. With this, you don't have to re-run the application every time you make changes
<dependency>
    <groupId>org.springframework.boot</groupId>
    <artifactId>spring-boot-devtools</artifactId>
</dependency>
To use this, auto-build and build while running features must be turned on
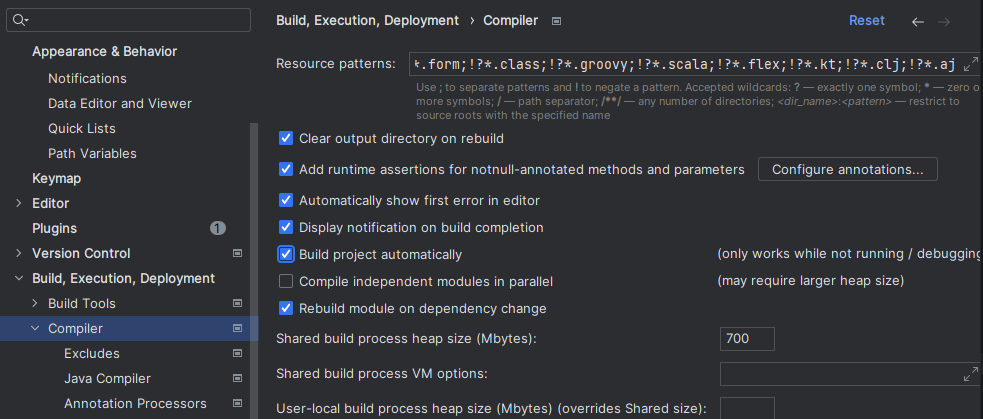
▶ Turning on the Auto Build
Setting -> Build, Execution, Development -> Compiler
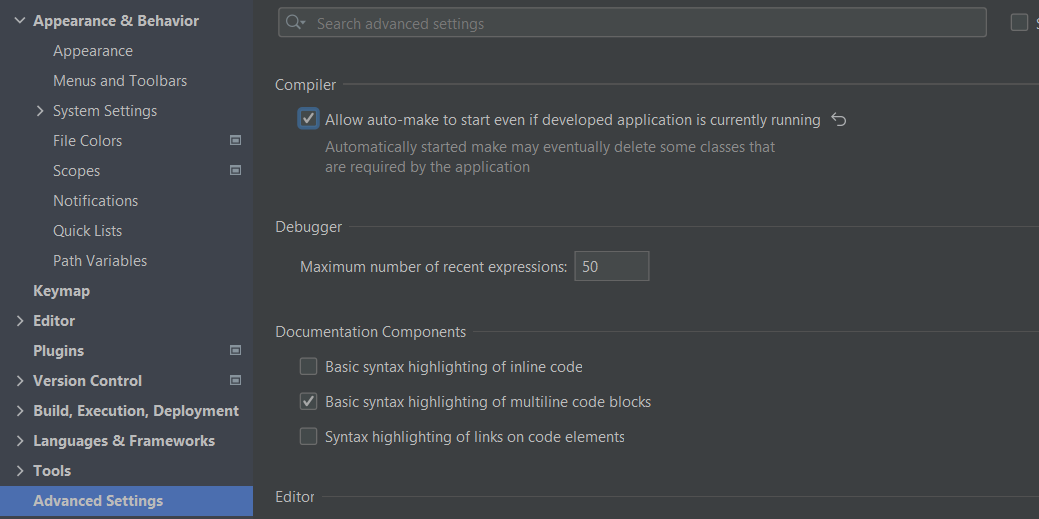
▶ Turning on build while running
Setting -> Advanced Settings. Check 'Allow auto-make to start even if the developed application is currently running'
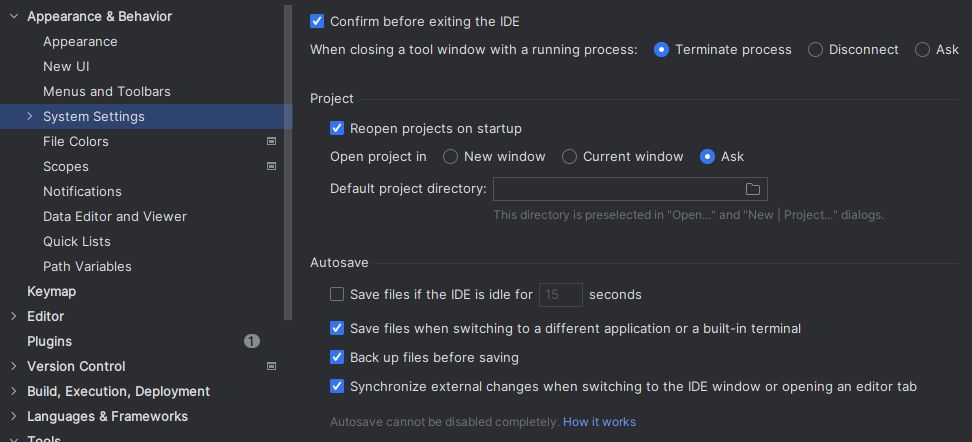
※ You can also use auto-save with this
▶ Turning on the Auto Save
Setting -> Appearance & Behavior -> System settings
스태틱 파일경로
We can use any of the following paths for the static files in the Spring boot
/META-INF/resources/resources/static/public
Thymeleaf
Thymeleaf is a Java template engine that runs on both the servlet-based web environment and the standalone environment. It is similar to JSP but has the .html extension.
Dependencies
<dependency>
  <groupId>org.springframework.boot</groupId>
  <artifactId>spring-boot-starter-thymeleaf</artifactId>
</dependency>
Controllers
Create a controller package and add a class, then add an endpoint. The string returned from the method is the name of the view template.

If you run the application without creating a view template with the name you specified above, you will see an error like this.

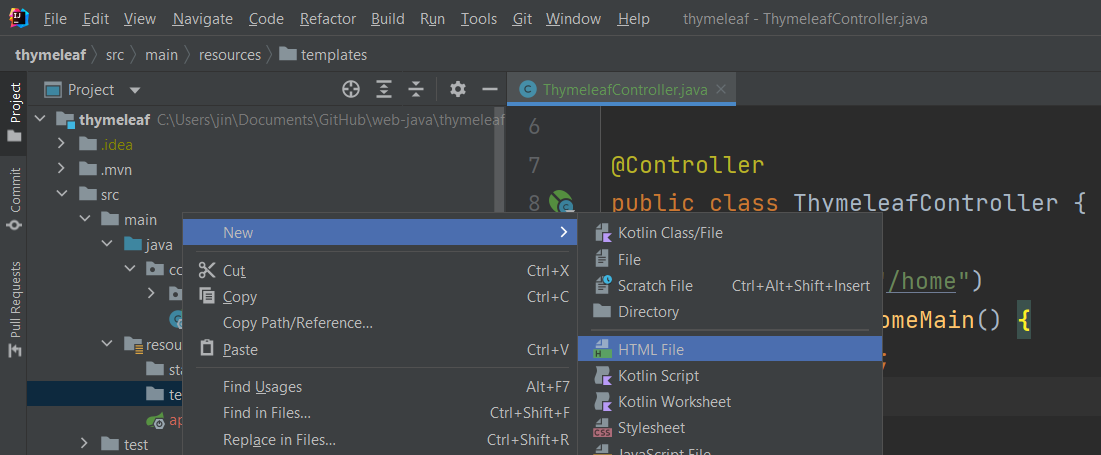
Templates
In the main -> resource -> template, add a template file with the name you specified in the controller method.
Add the Thymeleaf tag
<html xmlns:th="https://www.thymeleaf.org">
Using Dynamic Variables
▶ Passing Dynamic Values
Use the Model interface to pass values from the controller (The first parameter is for the key and the second is the value)
public String homeMain(Model model) {
  model.addAttribute("name", "dynamic");
  return "home";
}
▶ Using the Dynamic Value
Use the ${<Key>} syntax to use the dynamic value
<span th:text="${name}"></span>Fragments
Thymeleaf provides fragments that are equivalent to the components in Angular or React. To set a fragment we used fragment and id attribute
▶ Creating a Fragment
<nav th:fragment="header" id="fragment-h">
    <h1 id="fragment">Header</h1>
</nav>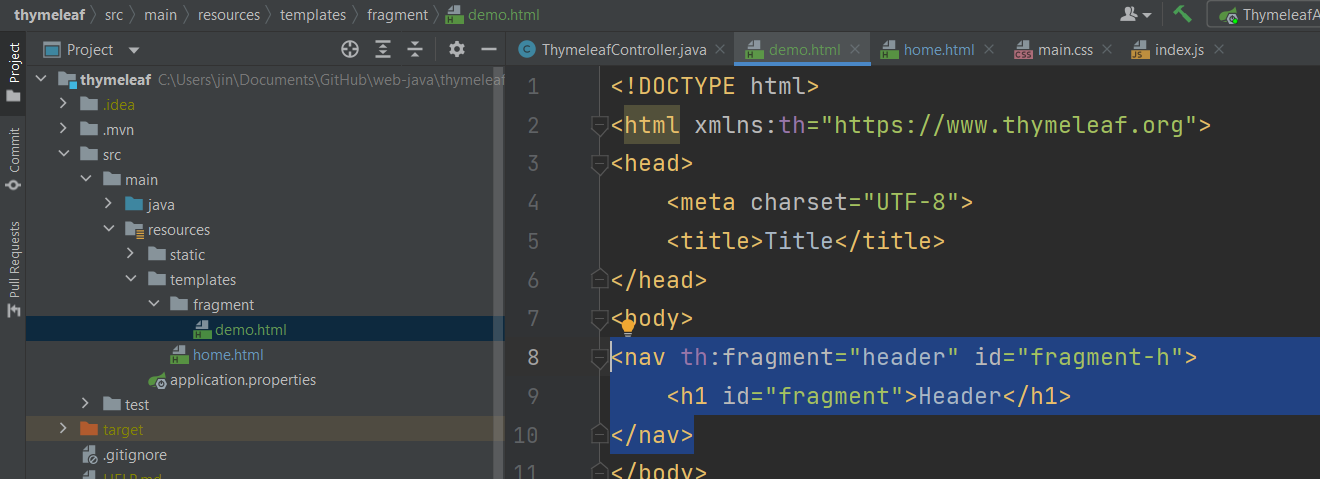
▶ Using the Fragment
There are three ways to use fragment
include
Shows only the context without the fragment tag under the host tag
<div th:include="fragment/demo :: header">insert
Shows the whole fragment tag under the host tag
호스트 태그 안에 내용을 포함 프래그멘트 태그 전체를 가져옴
<div th:insert="fragment/demo :: header">replace
Replace the host tag with the fragment tag
<div th:replace="fragment/demo :: header">Tag Examples
▶ Displaying Texts
<span th:text="${#strings.toUpperCase(name)}"></span>▶ Setting Local Variables
<div th:with="variable = ${name}, a=10, b=20">
  <p th:text="${a} * ${b}"></p>
</div>
▶ Condition
<p th:text="${elvis}? 'true':'false'"></p><p th:if="${elvis}">True</p>
<p th:unless="${elvis}">False</p><div th:switch="${elvis}">
<p th:case="true">True</p>
<p th:case="false">False</p>
</div>▶ Iteration
<div th:each="i, status: ${list}">
  <p th:style="${status.odd} ? 'color:red' : 'color':green"></p>
  <p th:text="${status.index}">${i}</p>
  <p th:text="${status.count}">${i}</p>
  <p th:text="${status.size}">${i}</p>
  <p th:text="${status.first}">${i}</p>
  <p th:text="${status.last}">${i}</p>
</div>
▶ Form
<form th:action="@{/formSubmit} method="GET">
  <input type="text" name="userName" />
</form>
Use the param in the result template
<body>
  <p>
    name: <span th:text="${param.userName}" />
  </p>
</body>
▶ Sending Id in the URL
<form th:action="@{/update/save/{id}(id=${book.id})}">
<a th:href="@{/books/remove/{id}(id=${books.id})}"</a>
▶ Getting objects from the controller
<form th:object="${book}">
  <div>
    <label for="isbn">ISBN</label>
    <input type="text" th:field="*{isbn}" id="isbn" placeholder="ISBN"/>
  </div>
  <div>
    <label for="name">Book Name</label>
    <input type="text" th:field="*{name}" id="name" placeholder="Book Name"/>
  </div>
</form>
▶ Redirection
return "redirect:/books";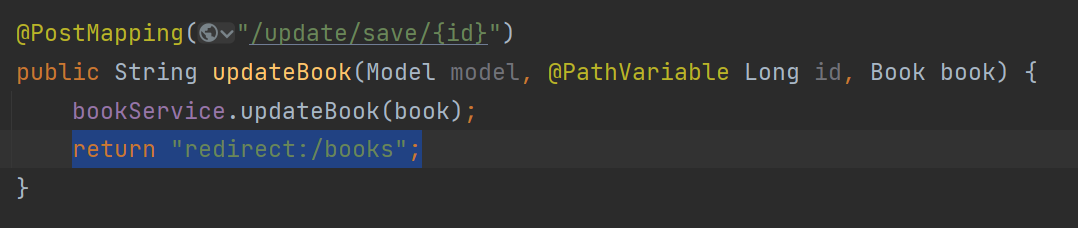
Linking to JS and CSS
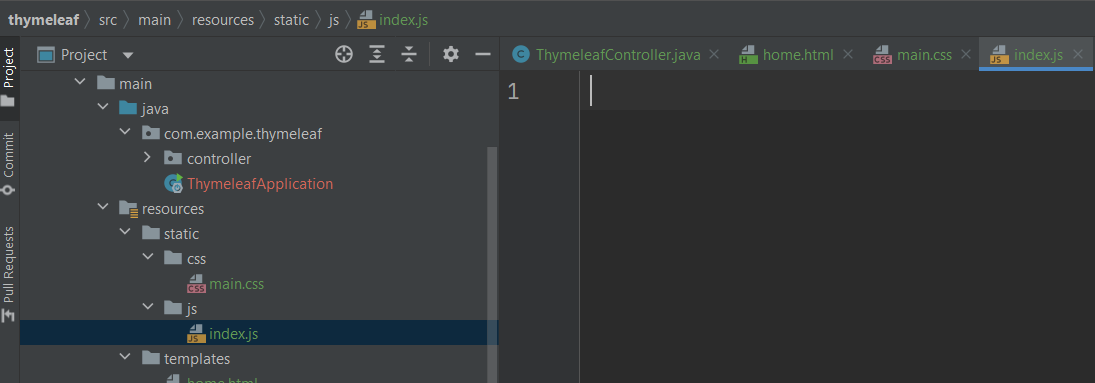
<script type="text/javascript" th:src="@{js/index.js}"></script>
<link rel="stylesheet" type="text/css" th:href="@{css/main.css}"/>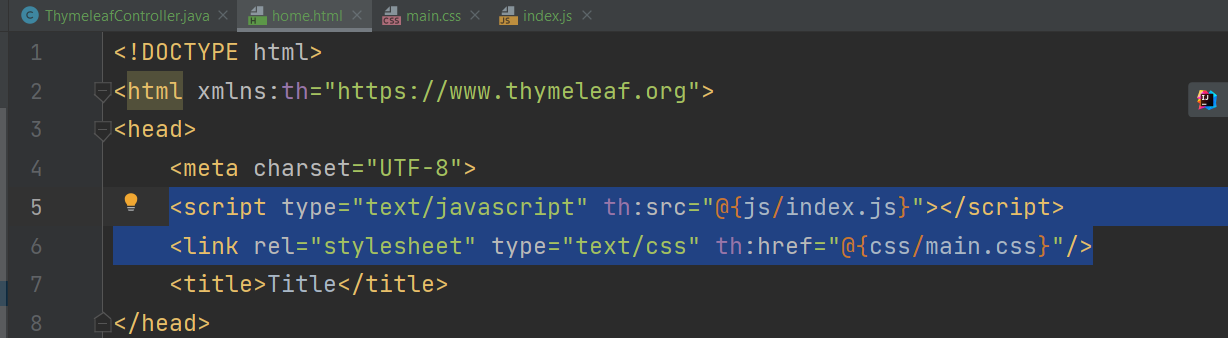
▶ 클래스 스타일 지정
<p th:text="Class" class="<className>"JSP
JSP (Java Server Pages) is an enhanced version of the servlet that provides many features to make the pages dynamic. It is the HTML file that can hold Java codes inside and it has the '.jsp' extension
How Dose It Work?
JSP codes are processed on the web server (not the client machine). So there are some tools needed for JSP to run
▶ JSP engine
Reads the JSP file and converts the file to the servlet which then runs on the server and creates the HTML file.
▶ Web Server
Handles the client's request
▶ Apache Tomcat
An open-source web server is a servlet container that renders the webpage by running the servlet or the JSP
▶ JavaEE (Enterprise Edition)
Provides the HTTP web server on which the Java code can run
▶ Java Runtime Environment(JRE)
Provides the environment for the Java application to run
Tags
Marks the start and end of the JSP tag
<% %>Sets a dynamic value
<%= %>Dependencies
Spring boot version 3.0 and above, javax package has changed its name to Jakarta. So depending on the Spring boot version you are using the configuration to use the JSP is different. Add relevant dependency in the pom.xlm file
Spring Boot 3.0 and above
Note that for the Spring boot 3.0 and above, Java 17 and above must be used
▶ Compiles the JSP file to the Tomcat server
<dependency>
    <groupId>org.apache.tomcat.embed</groupId>
    <artifactId>tomcat-embed-jasper</artifactId>
</dependency>
▶ A standard to use the Jakarta EE platform on the web
<dependency>
    <groupId>jakarta.servlet</groupId>
    <artifactId>jakarta.servlet-api</artifactId>
</dependency>
▶ JSTL Dependency
<dependency>
    <groupId>jakarta.servlet.jsp.jstl</groupId>
    <artifactId>jakarta.servlet.jsp.jstl-api</artifactId>
</dependency>

<dependency>
    <groupId>org.glassfish.web</groupId>
    <artifactId>jakarta.servlet.jsp.jstl</artifactId>
</dependency>
Before Spring Boot 3.0
▶ Compiles the JSP file to the Tomcat server
<dependency>
    <groupId>org.apache.tomcat.embed</groupId>
    <artifactId>tomcat-embed-jasper</artifactId>
</dependency>
▶ JSTL Dependency
<dependency>
    <groupId>javax.servlet</groupId>
    <artifactId>jstl</artifactId>
    <version>1.2</version>
</dependency>
▶ General Dependencies
Preventing Collisions
To prevent the collision between the Tomcat from the Spring boot runtime and the Tomcat from the JSP file, we need to add 'provided'
<dependency>
    <groupId>org.springframework.boot</groupId>
    <artifactId>spring-boot-starter-tomcat</artifactId>
    <scope>provided</scope>
</dependency>
<dependency>
<groupId>org.apache.tomcat.embed</groupId>
<artifactId>tomcat-embed-jasper</artifactId>
<scope>provided</scope>
</dependency>File Path Configurations
To include the JSP file in the compile file (war, jar), specify the path on the application.properties file
spring.mvc.view.prefix=/WEB-INF/jsp/
spring.mvc.view.suffix=.jsp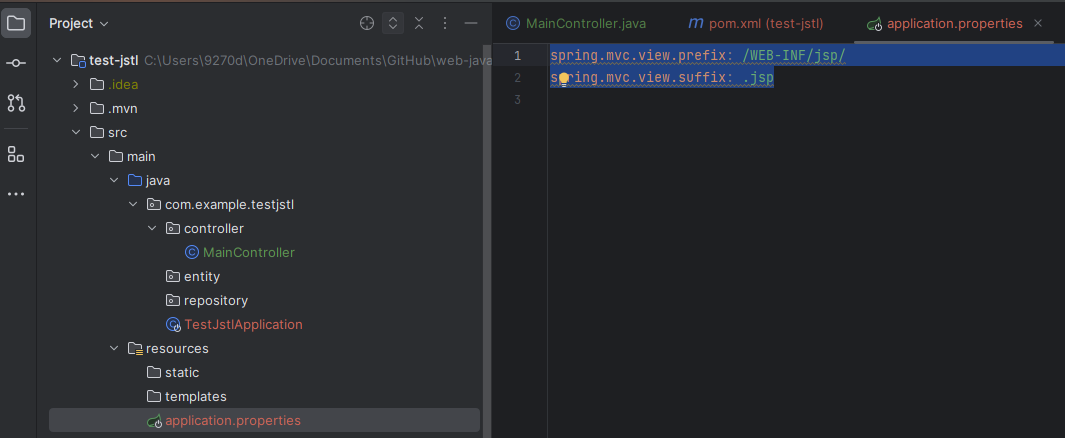
For example, if we return the 'book' to the container, it becomes the name of the file and the prefix comes in front of it and the suffix follows
Runtime Environment Settings
These two environments are for the application to run on. We can toggle between them using the code shown below
▶ Standalone
Run on a local machine without the network communications
import org.springframework.boot.SpringApplication;
import org.springframework.boot.autoconfigure.SpringBootApplication;

@SpringBootApplication
public class TestJstlApplication {
    public static void main(String[] args) {
        SpringApplication.run(TestJstlApplication.class, args);
    }
}
▶ Web Environment
Runs on the web server and uses the HTTP protocol to communicate with the client.
import org.springframework.boot.SpringApplication;
import org.springframework.boot.autoconfigure.SpringBootApplication;
import org.springframework.boot.builder.SpringApplicationBuilder;
import org.springframework.boot.web.servlet.support.SpringBootServletInitializer;

@SpringBootApplication
public class TestJstlApplication extends SpringBootServletInitializer {
    @Override
    protected SpringApplicationBuilder configure(SpringApplicationBuilder builder) {
        return builder.sources(TestJstlApplication.class);
    }

    public static void main(String[] args) {
        SpringApplication.run(TestJstlApplication.class, args);
    }
}
JSTL
JSTL(JavaServer Pages Standard Tag Library) is a library that provides various functions (conditions, iterations) as tags
Tags
There are Core, Formatting, SQL, XML, and Function tage in JSTL. Each set of function need its tag to be used
▶ Core
<%@ taglib prefix="c" uri="http://java.sun.com/jsp/jstl/core" %>▶ Formatting
<%@ taglib prefix="fmt" uri="http://java.sun.com/jsp/jstl/fmt" %>▶ SQL
<%@ taglib prefix="sql" uri="http://java.sun.com/jsp/jstl/sql" %>▶ XML
<%@ taglib prefix="x" uri="http://java.sun.com/jsp/jstl/xml" %>▶ JSTL Functions
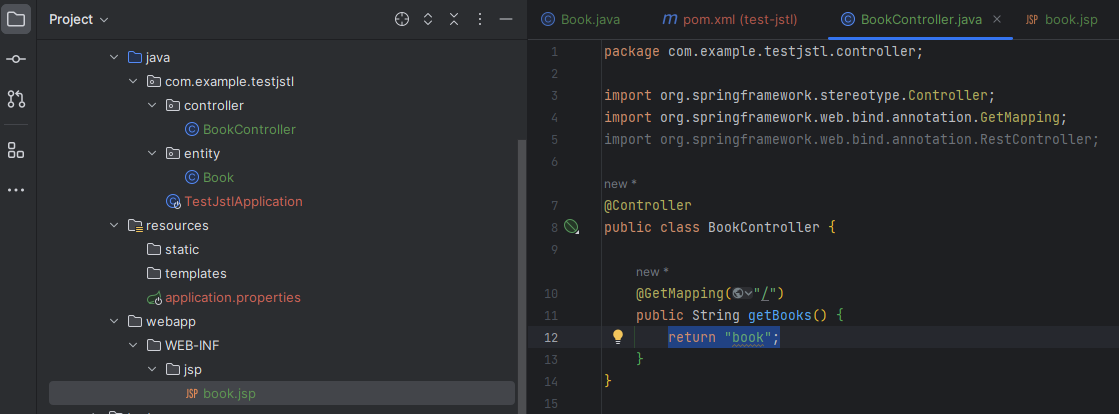
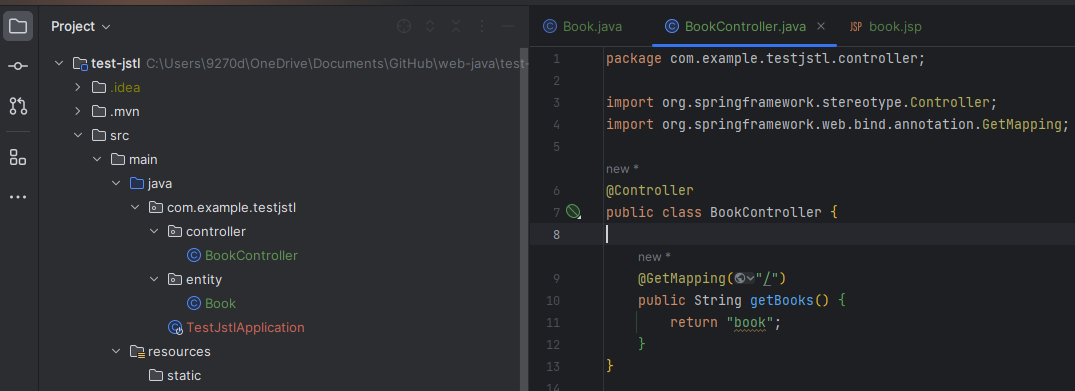
<%@ taglib prefix="fn" uri="http://java.sun.com/jsp/jstl/functions" %>Controllers
Create a controller package and a class. Add the @Controller annotation then add a method (endpoint). What is being returned becomes the path to find the JSP file so it should match the name of the JSP file
※ @RestController cannot be used with JSP for the following reasons
@Controller returns only the view
@Controller@RestController is a combination of both the @Controller and @ResponseBody. It can return data (JSON, XML, ...)
@RestControllerJSP also returns data and this duplication can cause a problem
Templates
Add the webapp folder under the main folder. And add subsquant folder as thery are specified in the application.properties. Make sure the file name matches to the name that is being returned in the controller
Tag Examples
Format Setup Tag
<%@ page language="java" contentType="text/html; charset=UTF-8" pageEncoding="UTF-8" %>JSTL Tags
<%@ taglib prefix="c" uri="http://java.sun.com/jsp/jstl/core" %>
<%@ taglib prefix="fmt" uri="http://java.sun.com/jsp/jstl/fmt" %>
<%@ taglib prefix="fn" uri="http://java.sun.com/jsp/jstl/functions" %>
<%@ taglib prefix="spring" uri="http://www.springframework.org/tags" %>
<%@ taglib prefix="sql" uri="http://java.sun.com/jsp/jstl/sql" %>
<%@ taglib prefix="x" uri="http://java.sun.com/jsp/jstl/xml" %>
JSTL Core
▶ Showing Dynamic Variables
<c:out value="${book}"/>※ Use the Model interface to send dynamic values from the controllers
model.addAttribute("book", "book");
▶ Setting Local Variables
<c:set value="JSTL" var="title"/>▶ Removing Local Variables (Null)
<c:remove var="title"/>▶ Catch
<c:catch var ="error">
    <% int x = Integer.valueOf("a");%>
</c:catch>
<c:out value="${error}"/>
▶ Condition
<c:if test="true">True</c:if>
<c:if var="result" test="true">${result}</c:if>
<c:out value="${num % 2 eq 0 ? 'even': 'odd'}"/><%@ page import="java.util.Calendar" %>
<c:set value="<%= Calendar.getInstance().get(Calendar.SECOND)%>" var="seconds"/>
<c:choose>
<c:when test="${seconds le 30 }">
<c:out value="${seconds} is less than 30"/>
</c:when>
<c:when test="${seconds eq 30 }">
<c:out value="${seconds} is equal to 30"/>
</c:when>
<c:otherwise>
<c:out value="${seconds} is greater than 30"/>
</c:otherwise>
</c:choose>▶ Iteration
<c:forEach var="i" items="1,4,5,6,7,8,9">
    <c:out value="${i}"/><p>
</c:forEach>
<c:forTokens
items = "Tom:Will:Jack:Amy"
delims = ":" var = "name">
<c:out value = "Name: ${name}"/><p>
</c:forTokens>▶ Import (Libraries, Contents)
<%@ page import="java.util.Calendar" %>
<c:set value="<%= Calendar.getInstance().get(Calendar.SECOND)%>" var="seconds"/>

/* saves the value from the local variable using the var attribute */
<%@ page var="date" import="java.util.Calendar" %>
<c:set value="<%= date.getInstance().get(date.SECOND)%>" var="seconds"/>
▶ Redirection
<c:url value = "./random.jsp" var = "url">
    <c:param name = "parameter_1" value = "1234"/>
    <c:param name = "parameter_2" value = "abcd"/>
</c:url>
<a href="${url}">Click</a>
<c:redirect url="./random.jsp"/>
JSTL Format
<c:set var="now" value="<%= new java.util.Date()%>"/>
<fmt:formatDate type="time" value="${now}"/>
<c:set var="today" value="28-03-2018"/>
<fmt:parseDate value="${today}" var="parsedDate" pattern="dd-MM-yyyy"/>
<c:out value="${parsedDate}"/><c:set var="fee" value="35050.10"/>
<fmt:formatNumber value="${fee}" type="currency"/>
<fmt:formatNumber value="${fee}" type="number"/>
<fmt:formatNumber value="${fee}" type="percent"/>
<fmt:parseNumber var="i" type="number" value="${fee}"/>
<c:out value="${i}"/>▶ Bundle, Locale
<fmt:bundle basename="com.baeldung.jstl.bundles.CustomMessage" prefix="verb.">
    <fmt:message key="go"/><br/>
    <fmt:message key="come"/><br/>
    <fmt:message key="sit"/><br/>
    <fmt:message key="stand"/><br/>
</fmt:bundle>
<fmt:setBundle basename="com.baeldung.jstl.bundles.CustomMessage" var="lang"/><fmt:setLocale value="fr_FR"/><fmt:timeZone value="${zone}">
<fmt:formatDate value="${now}" timeZone="${zn}"
type="both"/>
</fmt:timeZone><fmt:setTimeZone value="GMT+9"/><fmt:setBundle basename = "com.baeldung.jstl.bundles.CustomMessage" var = "lang"/>
<fmt:message key="verb.go" bundle="${lang}"/>▶ Encoding
<fmt:requestEncoding value = "UTF-8" />JSTL Function
▶ String
<c:set var = "string1" value = "This is first string"/>
/* contains (sub string) */
<c:if test = "${fn:contains(string1, 'first')}">
    <p>Found 'first'<p>
</c:if>

<c:if test = "${fn:containsIgnoreCase(string1, 'FIRST')}">
    <p>Found 'FIRST' string<p>
</c:if>

/* starts with */
<c:if test = "${fn:startsWith(string1, 'This')}">
    <p>starts with 'This'</p>
</c:if>

/* ends with */
<c:if test="${fn:endsWith(string1, 'string')}">
    <p>ends with 'string'<p>
</c:if>

/* escape XML mark up */
<p>${fn:escapeXml(string1)}</p>

/* index of */
<p>Index: ${fn:indexOf(string1, "first")}</p>

/* split */
<c:set var = "string3" value = "${fn:split(string1, ' ')}" />
<c:out value="${string3}"/>

/* join */
<c:set var = "string4" value = "${fn:join(string3, '-')}" />
<c:out value="${string4}"/>

/* length */
<p>Length: ${fn:length(string1)}</p>

/* replace */
<c:set var = "string3" value = "${fn:replace(string1, 'first', 'third')}" />

/* sub string: Extracts the text within the index range given */
<c:set var = "string3" value = "${fn:substring(string1, <startIndex>, <endIndex>)}" />

/* sub string: Extracts the text after the index given */
<c:set var = "string3" value = "${fn:substringAfter(string1, 'is')}" />

/* sub string: Extracts the text before the index given */
<c:set var = "string3" value = "${fn:substringBefore(string1, 'is')}" />

/* to lowercase */
<c:set var = "string3" value = "${fn:toLowerCase(string1)}" />

/* to uppercase */
<c:set var = "string3" value = "${fn:toUpperCase(string1)}" />

/* trim */
<c:set var = "string1" value = "This is first String    "/>
In this writing, we have seen some of the view templates in the Spring boot.
References
JSP - Standard Tag Library (JSTL) Tutorial | Tutorialspoint
JSP - Standard Tag Library (JSTL) Tutorial
JSP Standard Tag Library (JSTL) Tutorial - In this chapter, we will understand the different tags in JSP. The JavaServer Pages Standard Tag Library (JSTL) is a collection of useful JSP tags which encapsulates the core functionality common to many JSP appli
www.tutorialspoint.com
A Guide to the JSTL Library | Baeldung
'Backend > Java' 카테고리의 다른 글
| Spring Boot Security (1) | 2023.10.01 |
|---|---|
| Spring Boot Actuator (0) | 2023.10.01 |
| Data Persistency Tools (JPA, Hybernate, Mybatis) (3) | 2023.09.09 |
| Spring Boot API (0) | 2023.08.23 |
| Creating a Spring Boot Project (1) | 2023.08.05 |


