indexed db는 사용자의 브라우저에 데이터를 저장하는 기능을 말합니다. 클라이언트 측에 데이터를 저장한다는 점에서 웹스토리지와 비슷하지만 더 많은 데이터를 저장할 수 있는 장점이 있습니다.
indexed db는 일반적인 데이터베이스처럼 생성, 저장, 활용하는 단계를 거칩니다.
생성하기
open("dbName", version): 데이터베이스 열기 (존재하지 않는 경우 새로 생성됨). 참고로 스키마 (데이터베이스의 구조)는 버전에 따라 달라집니다.
const req = window.indexedDB.open("cars", 3);open 사용 시 바로 데이터베이스가 열리는 것이 아니라 요청에 대한 성공 또는 실패가 반환됩니다. 다만, 데이터베이스를 생성하거나 버전을 변경할 때는 '.onupgradeneeded'라는 이벤트를 활용합니다. 따라서, 결과에 따라 아래와 같이 데이터베이스 생성이 가능합니다.
// 저장할 데이터
const carData = [
  { id: "1", year: "2000", model: "BMW" },
  { id: "2", year: "2001", model: "Toyota" }
];

// 데이터베이스 요청
const req = indexedDB.open("cars", 3);

req.onerror = (event) => { // 에러발생 시 처리
  // Handle errors.
};
req.onupgradeneeded = (event) => { // 요청성공시 데이터베이스 생성
  const db = event.target.result;

  // 데이터가 저장될 객체 생성 (관계형에서 테이블 개념)
  const objectStore = db.createObjectStore("cars", { keyPath: "id" });

  // 인덱스 생성 (생략가능)
  objectStore.createIndex("year", "year", { unique: false });
  objectStore.createIndex("model", "model", { unique: false });

  // 데이터를 저장할 객체 생성이 완료되었는지 확인하는 이벤트
  objectStore.transaction.oncomplete = (event) => {
    const carObjectStore = db.transaction("cars", "readwrite").objectStore("cars");
    carData.forEach((car) => {
      carObjectStore.add(car);
    });
  };
};
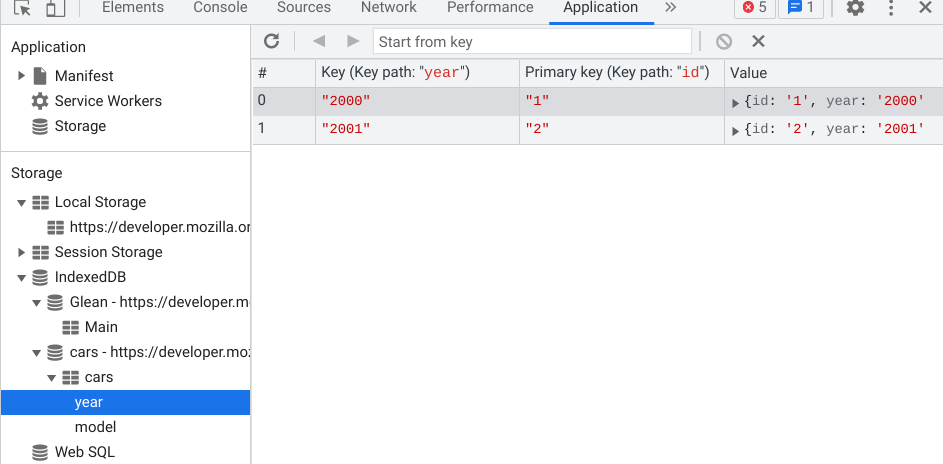
아래와 같이 개발자도구 -> 'Application'에서 생성된 데이터베이스 확인이 가능합니다.

참고로, 'cars'밑에 'year'와 'model'은 인덱스 생성 코드를 생략 시 생성되지 않습니다.

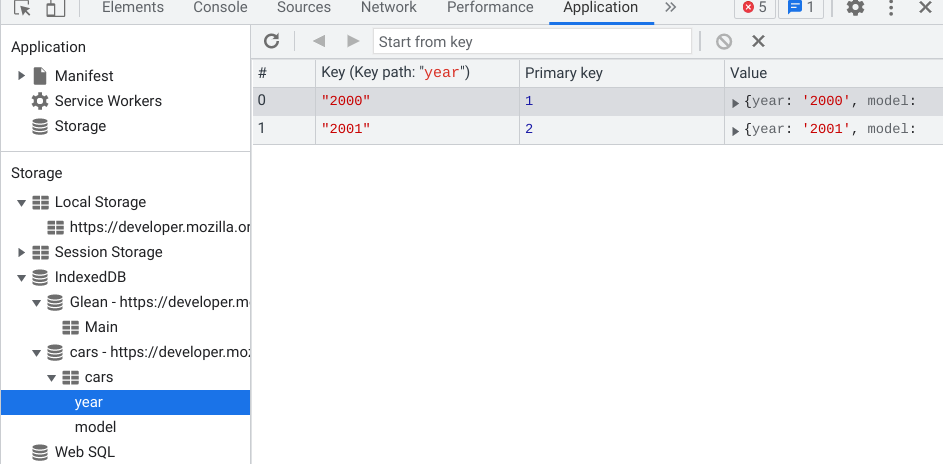
위 코드에서는 id값을 지정하여 primay key로 사용하였는데요. 아래와 같이 자동 생성도 가능합니다.
const carData = [
  { year: "2000", model: "BMW" },
  { year: "2001", model: "Toyota" }
];


const req = indexedDB.open("cars", 3);

req.onerror = (event) => {
  // Handle errors.
};
req.onupgradeneeded = (event) => {
  const db = event.target.result;

  // 데이터가 저장될 객체 생성 (관계형에서 테이블 개념) - 자동증가 옵션
  const objectStore = db.createObjectStore("cars", { keyPath: 'id', autoIncrement: true });

  objectStore.createIndex("year", "year", { unique: false });
  objectStore.createIndex("model", "model", { unique: false });

  objectStore.transaction.oncomplete = (event) => {
    const carObjectStore = db.transaction("cars", "readwrite").objectStore("cars");
    carData.forEach((car) => {
      carObjectStore.add(car);
    });
  };
};
생성된 객체에서 데이터를 가져오거나, 수정 및 삭제하기는 transaction(["objectName"], "mode")이라는 기능을 사용합니다. transaction의 두 번째 매개변수인 모드는 "readonly", "readwrite", "versionchange"의 세 가지 값을 가지며 생략 시 "readonly"가 적용됩니다.
읽기
1. 특정 데이터 읽기 (사용되는 값은 유일한 값이어야 함)
const req = indexedDB.open("cars", 3);

req.onerror = (event) => {
  // Handle errors.
};

req.onsuccess = (event) => {
  const db = event.target.result;
  const transaction = db.transaction(["cars"]);
  const objectStore = transaction.objectStore("cars");
  const data = objectStore.get("1");

  data.onerror = (event) => {
  	// Handle errors
  };

  data.onsuccess = (event) => {
    console.log(`BMW - ${data.result.year}`);
  };
};
반환된 값은 아래와 같습니다.

아래와 같은 문법으로도 가능합니다.
const req = indexedDB.open("cars", 3);

req.onerror = (event) => {
  // Handle errors.
};

req.onsuccess = (event) => {
  const db = event.target.result;
  db.transaction("cars").objectStore("cars").get("1").onsuccess = (event) => {
    console.log(`BMW - ${event.target.result.year}`);
  };
};
2. 특정 데이터 읽기 (일치하는 첫 번째 데이터를 반환)
const req = indexedDB.open("cars", 3);

req.onerror = (event) => {
  // Handle errors.
};

req.onsuccess = (event) => {
  const db = event.target.result;
  const transaction = db.transaction(["cars"]);
  const objectStore = transaction.objectStore("cars");
  const index = objectStore.index("model");

  index.get("BMW").onsuccess = (event) => {
    console.log(`BMW - ${event.target.result.year}`);
  };
};
3. 모든 데이터 읽기
모든 데이터를 읽기 위해서 .openCursor()를 사용합니다. 기본적으로 오름차순으로 데이터를 읽어오는데요, 내림차순으로 변경은 .openCursor("prev")라는 매개변수를 추가하여 설정합니다.
const req = indexedDB.open("cars", 3);

req.onerror = (event) => {
  // Handle errors.
};

req.onsuccess = (event) => {
  const db = event.target.result;
  const objectStore = db.transaction("cars").objectStore("cars");

  objectStore.openCursor().onsuccess = (event) => {
    const cursor = event.target.result;
    if (cursor) {
      console.log(`${cursor.key} is ${cursor.value.model}`);
      cursor.continue();
    } else {
      console.log("Done");
    }
  };
};
범위 추가하기
// Only -> 반드시 일치
const singleKeyRange = IDBKeyRange.only("BMW");

// 명시된 값을 포함한 이후의 데이터들
const lowerBoundKeyRange = IDBKeyRange.lowerBound("BMW");

// 명시된 값을 제외한 이후의 데이터들
const lowerBoundOpenKeyRange = IDBKeyRange.lowerBound("BMW", true);

// 명시된 값을 제외한 이전의 데이터들
const upperBoundOpenKeyRange = IDBKeyRange.upperBound("Ford", true);

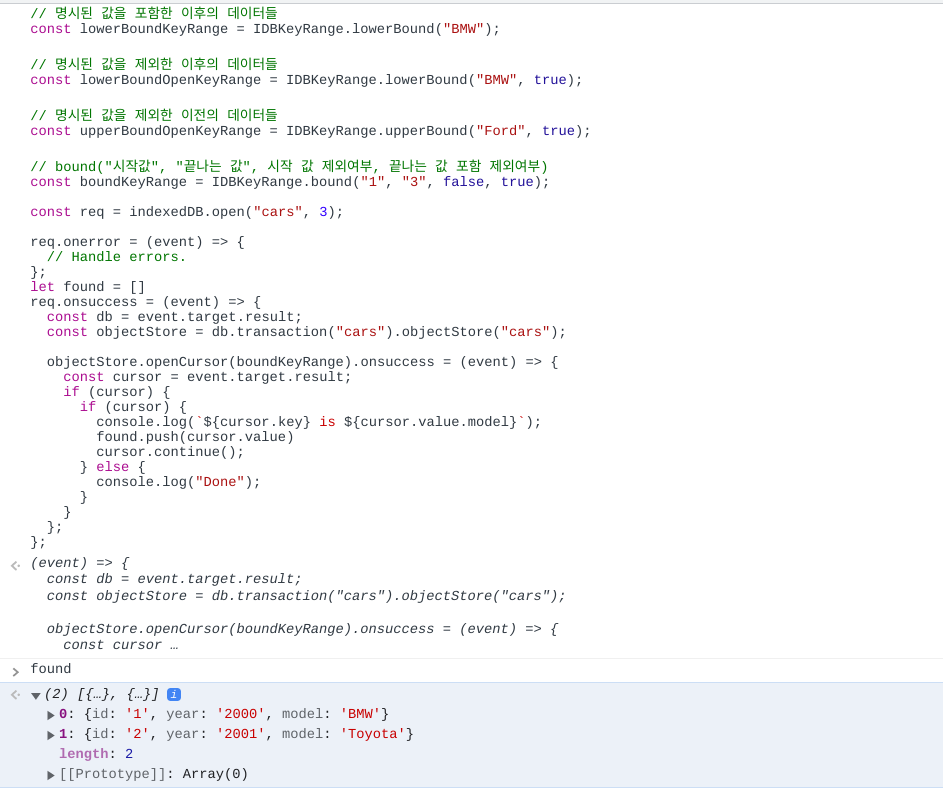
// bound("시작값", "끝나는 값", 시작 값 제외여부, 끝나는 값 포함 제외여부)
const boundKeyRange = IDBKeyRange.bound("1", "3", false, true);

const req = indexedDB.open("cars", 3);

req.onerror = (event) => {
  // Handle errors.
};

req.onsuccess = (event) => {
  const db = event.target.result;
  const objectStore = db.transaction("cars").objectStore("cars");

  objectStore.openCursor(boundKeyRange).onsuccess = (event) => {
    const cursor = event.target.result;
    if (cursor) {
      if (cursor) {
        // action console.log(`${cursor.key} is ${cursor.value.model}`);
        cursor.continue();
      } else {
        console.log("Done");
      }
    }
  };
};
데이터 추가하기
const newCarData = [
  { id: "3", year: "2020", model: "Ford" },
];

const req = indexedDB.open("cars", 3);

req.onerror = (event) => {
  // Handle errors.
};

req.onsuccess = (event) => {
  const db = event.target.result;
  const transaction = db.transaction(["cars"], "readwrite");
  const objectStore = transaction.objectStore("cars");

  transaction.oncomplete = (event) => {
    // complete
  };

  transaction.onerror = (event) => {
    // handle errors
  };

  newCarData.forEach((car) => {
    const req = objectStore.add(car);

    req.onerror = (event) => {
      alert("failed");
    };

    req.onsuccess = (event) => {
      alert("a new car added");
    };
  });
};
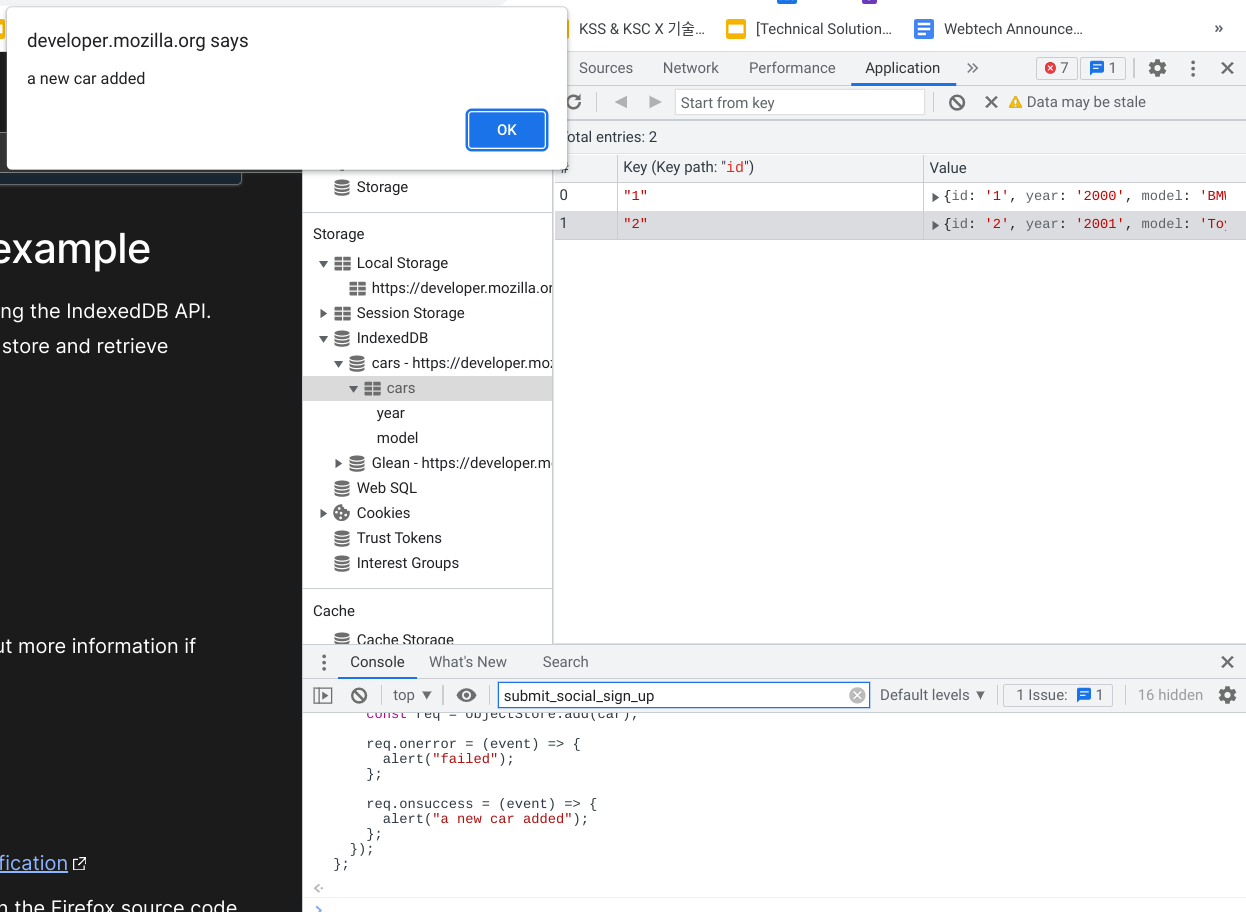
추가된 데이터

주의할 점은 일반적인 데이터베이스와 같이 필수 항목은 반드시 넣어 주어야합니다 (필수항목을 넣지 않고 입력을 시도하더라도 오류가 뜨지 않기 때문에 디버깅이 힘듦). 필수값이 아닌 경우 아래와 같이 생략가능합니다.

수정하기
const req = indexedDB.open("cars", 3);

req.onerror = (event) => {
  // Handle errors.
};

req.onsuccess = (event) => {
  const db = event.target.result;
  const objectStore = db.transaction(["cars"], "readwrite").objectStore("cars");

  const request = objectStore.get("1");
  request.onerror = (event) => {
    // Handle errors
  };

  request.onsuccess = (event) => {
    // Get the old value that we want to update
    const data = event.target.result;

    // update
    data.year = 1942;

    // Put this updated object back into the database.
    const requestUpdate = objectStore.put(data);

    requestUpdate.onerror = (event) => {
      alert("failed")
    };

    requestUpdate.onsuccess = (event) => {
      alert("Updated")
    };
  };
};
다만, 아래와 같이 타입 제한없이 업데이트되기 때문에 주의를 요합니다.

삭제하기
const req = indexedDB.open("cars", 3);

req.onerror = (event) => {
  // Handle errors.
};

req.onsuccess = (event) => {
  const db = event.target.result;

  const request = db.transaction(["cars"], "readwrite")
  .objectStore("cars")
  .delete("3");
  request.onsuccess = (event) => {
    alert("deleted")
  };
};

이상으로 indexed db에 대해서 알아보았습니다.
참고
IndexedDB API - Web APIs | MDN
IndexedDB is a low-level API for client-side storage of significant amounts of structured data, including files/blobs. This API uses indexes to enable high-performance searches of this data. While Web Storage is useful for storing smaller amounts of data,
developer.mozilla.org
'프론트엔드 > 자바스크립트' 카테고리의 다른 글
| 프로젝트 - 그림판 (0) | 2023.01.04 |
|---|---|
| 프로젝트 - 계산기 (0) | 2023.01.01 |
| 클라이언트 측 데이터 저장소 - 웹 스토리지 (Web Storage) (0) | 2022.12.29 |
| 프로젝트 - to do (0) | 2022.12.29 |
| 프로젝트 - 뮤직 플레이어 (0) | 2022.12.28 |


