
스프링부트에서는 데이터베이스의 데이터를 보다 쉽게 컨트롤하기 위해 다양한 도구를 사용할 수 있습니다. 오늘은 Database Persistence 도구들에 대해 알아보겠습니다.
목차
제이피에이 (JPA)
JPA (Java Persistence API)는 자바 애플리케이션에서 관계형 데이터베이스를 활용하기 위한 정의를 담고 있으며 서비스와 데이터베이스 중간에서 데이터 조작을 위한 명령어 수행을 도와줍니다. 제이피에이는 하이버네이트 (Hibernate)와 연동하여 사용 가능합니다.
디펜던시
▶ JPA
엔티티로부터 데이터베이스에 테이블 생성
<dependency>
    <groupId>org.springframework.boot</groupId>
    <artifactId>spring-boot-starter-data-jpa</artifactId>
</dependency>
▶ Spring Web
HTTP요청처리를 위한 어노테이션과 웹 서버 구동을 위해 필요.
<dependency>
    <groupId>org.springframework.boot</groupId>
    <artifactId>spring-boot-starter-web</artifactId>
</dependency>
▶ Spring Rest
JPA CRUD 엔드포인트를 자동으로 제공.
<dependency>
    <groupId>org.springframework.boot</groupId>
    <artifactId>spring-boot-starter-data-rest</artifactId>
</dependency>
어노테이션
@RestController
특정 클래스를 데이터 전송이 가능한 컨트롤러로 사용하기 위해 필요
@Autowired@Autowired
매퍼를 스프링 빈에 등록
@Autowired@Entity
특정 클래스를 데이터 전송이 가능한 컨트롤러로 사용하기 위해 필요
@Entity@Id
특정 클래스를 데이터 전송이 가능한 컨트롤러로 사용하기 위해 필요
@Id제이에스피 설정
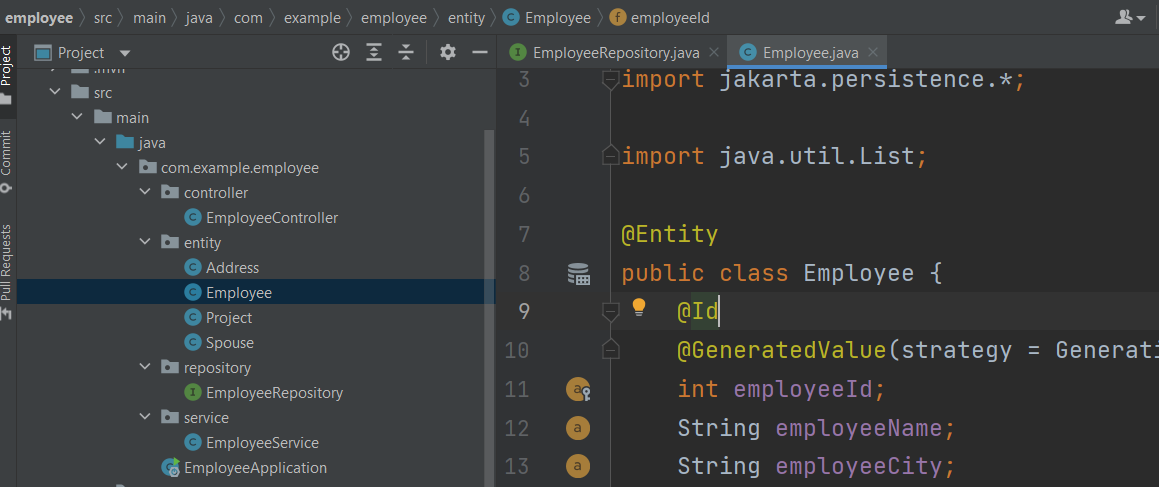
엔티티 설정
엔티티 패키지 생성 후 그 아래 엔티티 클래스 생성, @Entity, @Id 어노테이션 추가 (@Entity, @Id, 매개변수를 가지지 않는 기본 생성자는 제이피에이 사용을 위해 필수)
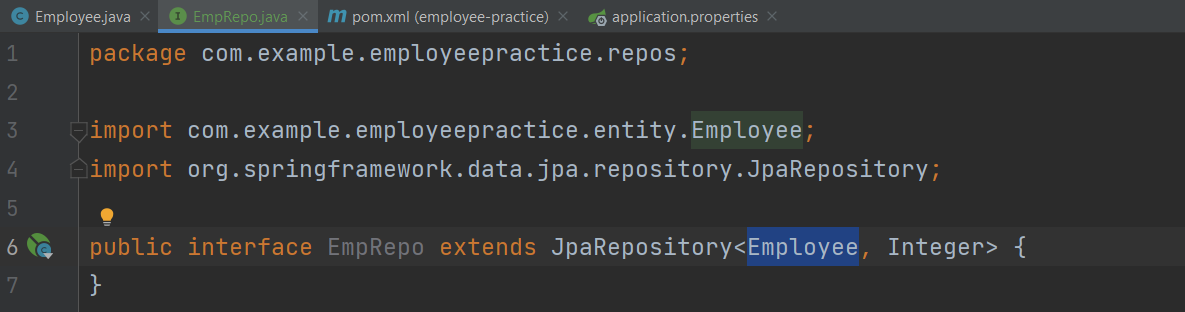
레포지토리 설정
레포지토리 패키지 생성 후 그 아래 레포지토리 클래스 생성. 아래 인터페이스를 익스텐드 하고 지네릭 타입으로 엔티티와 그 엔티티에 주키 타입으로 사용된 타입 입력
JpaRepository<<entityName>, <PKType>>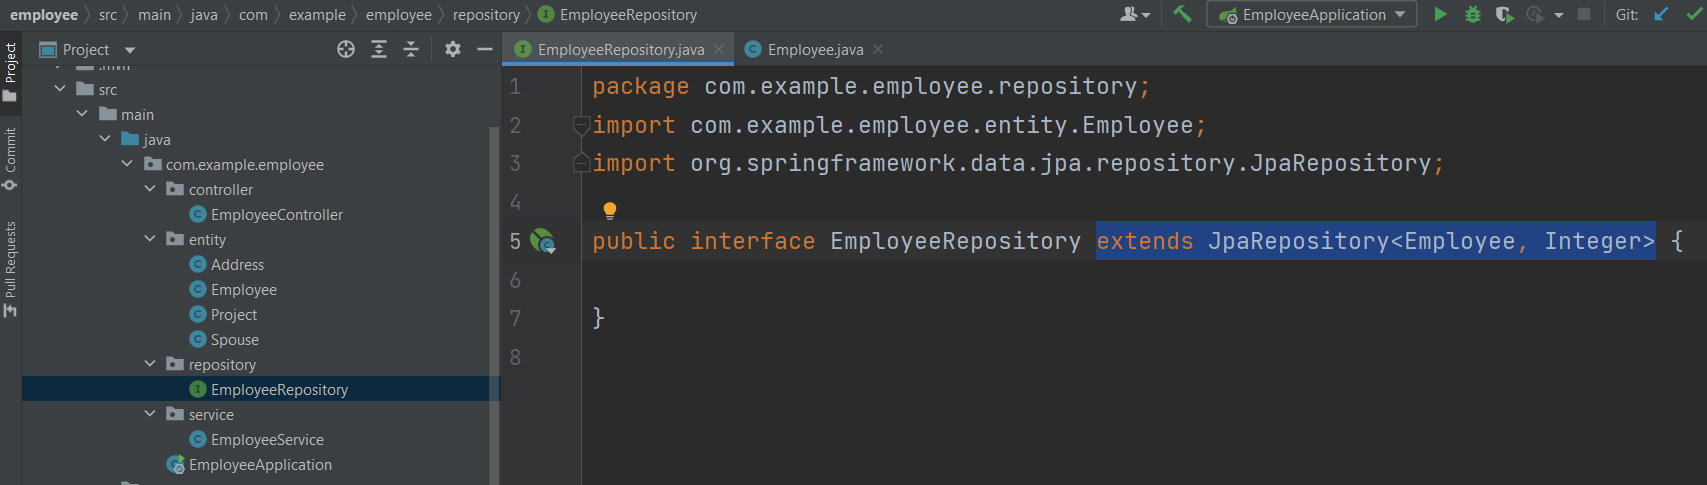
서비스 설정
@Service
public class EmployeeService {
    @Autowired
    EmployeeRepository employeeRepository;
}
package com.example.employee.service;
import com.example.employee.entity.Address;
import com.example.employee.entity.Employee;
import com.example.employee.repository.EmployeeRepository;
import org.springframework.beans.factory.annotation.Autowired;
import org.springframework.stereotype.Service;
import java.util.ArrayList;
import java.util.List;
@Service
public class EmployeeService {
@Autowired
EmployeeRepository employeeRepository;
public List<Employee> getEmployees() {
return employeeRepository.findAll();
}
public Employee getEmployee(int employeeId) {
return employeeRepository.findById(employeeId).orElseThrow(() -> new RuntimeException("Not found"));
}
public void addEmployee(Employee employee) {
employeeRepository.save(employee);
}
public void updateEmployee(Employee employee) {
employeeRepository.save(employee);
}
public void deleteEmployee(int id) {
employeeRepository.delete(employeeRepository.getReferenceById(id));
}
}컨트롤러 설정
@RestController
public class EmployeeController {
    @Autowired
    EmployeeService employeeService;
}
package com.example.employee.controller;
import com.example.employee.entity.Employee;
import com.example.employee.service.EmployeeService;
import org.springframework.beans.factory.annotation.Autowired;
import org.springframework.stereotype.Controller;
import org.springframework.web.bind.annotation.*;
import java.util.List;
@RestController
public class EmployeeController {
@Autowired
EmployeeService employeeService;
@GetMapping("/employees")
public List<Employee> getEmployees() {
return employeeService.getEmployees();
}
@GetMapping("/employees/{id}")
public Employee getEmployee(@PathVariable int id) {
return employeeService.getEmployee(id);
}
@PostMapping("/employees")
public void addEmployee(@RequestBody Employee employee) {
employeeService.addEmployee(employee);
}
@PutMapping("/employees/{id}")
public void updateEmployee(@PathVariable int id, @RequestBody Employee employee) {
employeeService.updateEmployee(employee);
}
@DeleteMapping("/employees/{id}")
public void deleteEmployee(@PathVariable int id) {
employeeService.deleteEmployee(id);
}
}스프링 Rest 사용하기
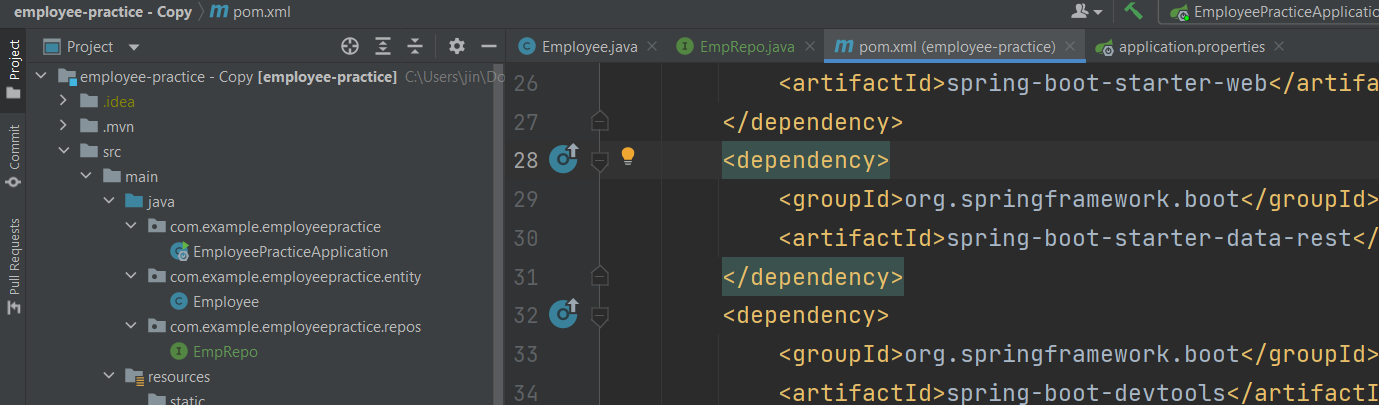
스프링 REST는 엔티티와 JpaRepository를 사용하여 CRUD에 필요한 기본 엔드포인트를 자동으로 제공해 주는 디펜던시입니다.
pom.xml파일에 디펜던시 추가
<dependency>
    <groupId>org.springframework.boot</groupId>
    <artifactId>spring-boot-starter-data-rest</artifactId>
</dependency>
엔티티와 레포지토리 (DAO)를 제외한 나머지 패키지 (컨트롤러, 서비스) 삭제
※ 엔드포인트 생성은 DAO에 제공된 클래스명에 's'를 붙여서 생성
경로변경은 아래 어노테이션 활용
@RepositoryRestResource(path = "<path>")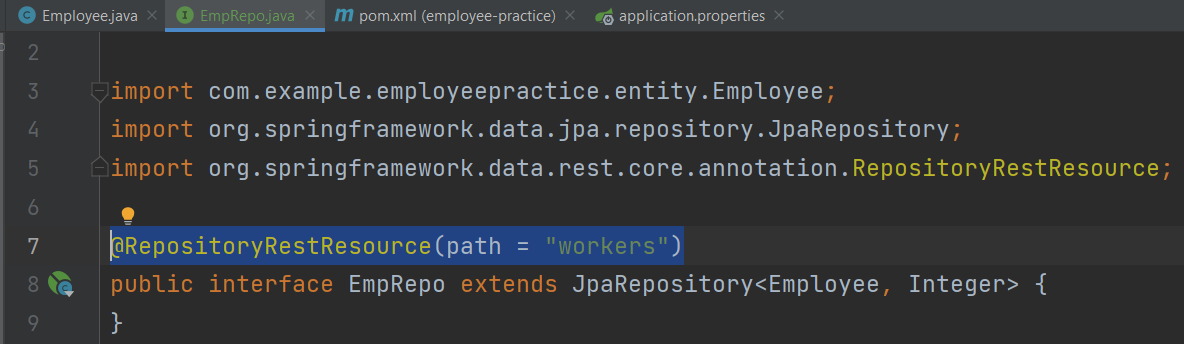
※ 경로 파라미터를 통해 페이지네이션, 정렬 등도 가능
▶ 페이지네이션
http://localhost:8080/employees?page=<index>▶ 페이지네이션 사이즈 설정 (application.properties)
spring.data.rest.default-page-size=<val>▶ 정렬 (오름차순)
http://localhost:8080/employees?sort=<condition>▶ 정렬 (내림차순)
http://localhost:8080/employees?sort=<condition>,desc▶ 정렬 (복수 조건)
http://localhost:8080/employees?sort=<condition>,<condition>H2 데이터베이스 연결하기
스프링 부트 에이피아이
오늘 포스팅에서는 스프링부트의 애플리케이션의 기본구조를 살펴보고 에이피아이 서버 애플리케이션을 만들고 데이터의 생성, 검색, 수정, 삭제 기능을 구현 및 H2 데이터베이스를 추가하는
jin-co.tistory.com
하이버네이트
하이버네이트는 JPA 인터페이스의 구현 클래스 중 하나로 자바클래스와 데이터베이스 테이블의 매핑기능 (ORM)을 제공
디펜던시
▶ JPA
<dependency>
  <groupId>org.springframework.boot</groupId>
  <artifactId>spring-boot-starter-data-jpa</artifactId>
</dependency>
▶ MySQL
<dependency>
  <groupId>com.mysql</groupId>
  <artifactId>mysql-connector-j</artifactId>
  <scope>runtime</scope>
</dependency>
어노테이션
▶ @Entity
JPA 클래스 테이블 생성을 위해 필요
@Entity▶ @Table
JPA 클래스 테이블 이름은 클래스이름으로 생성되는 데 이를 원하는 이름으로 수정할 때 사용
@Table(name="<name>")▶ @Id
관계형 데이터베이스에 필요한 주키설정
@Id▶ @GeneratedValue
주키 자동 생성옵션
@GeneratedValue(strategy = GenerationType.IDENTITY)▶ @Transaction
데이터베이스에 데이터를 저장, 수정, 삭제할 때 필요
@Transaction하이버네이트 사용하기
엔티티
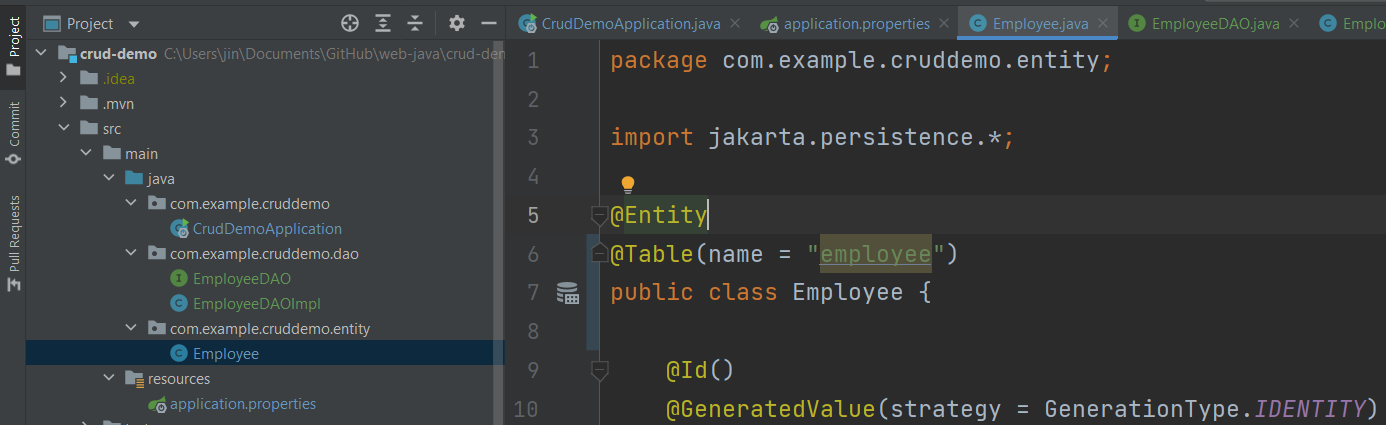
엔티티 클래스를 생성하고 @Entity 어노테이션 추가
▶ 완성코드
package com.example.cruddemo.entity;

import jakarta.persistence.*;

@Entity
@Table(name = "employee")
public class Employee {

    @Id()
    @GeneratedValue(strategy = GenerationType.IDENTITY)
    @Column(name = "id")
    private int id;

    @Column(name = "first_name")
    private String firstName;

    @Column(name = "last_name")
    private String lastName;

    @Column(name = "email")
    private String email;

    public Employee() {
    }

    public Employee(String firstName, String lastName, String email) {
        this.firstName = firstName;
        this.lastName = lastName;
        this.email = email;
    }

    @Override
    public String toString() {
        return "Employee{" +
                "id=" + id +
                ", firstName='" + firstName + '\'' +
                ", lastName='" + lastName + '\'' +
                ", email='" + email + '\'' +
                '}';
    }

    public int getId() {
        return id;
    }

    public void setId(int id) {
        this.id = id;
    }

    public String getFirstName() {
        return firstName;
    }

    public void setFirstName(String firstName) {
        this.firstName = firstName;
    }

    public String getLastName() {
        return lastName;
    }

    public void setLastName(String lastName) {
        this.lastName = lastName;
    }

    public String getEmail() {
        return email;
    }

    public void setEmail(String email) {
        this.email = email;
    }
}
DAO
DAP 인터페이스 추가
인터페이스 구현체 추가 후 JPA EntityManager 인젝션. EntityManager 엔티티에 데이터를 저장하거나 가져오기 위해 사용

@SpringBootApplication 어노테이션 사용 시 Entity Manager 빈을 인식하지 못한다는 오류 메시지가 뜨는데 이는 스프링 시스템의 오류로 앱 작동에 영향을 주지 않으므로 무시합니다. (메시지가 걸리적거리면, @SpringBootApplication 대신 @Configuration, @EnableAutoConfiguration, @ComponentScan 어노테이션을 사용하면 에러 메시지가 사라집니다).
CRUD
리스트 반환
▶ DAO
List<Employee> findAll();▶ DAO Imple
@Override
public List<Employee> findAll() {
    TypedQuery<Employee> query = entityManager.createQuery("FROM Employee order by lastName", Employee.class);
    return query.getResultList();
}
필터
▶ DAO
List<Employee> findByLastName(String lastName);▶ DAO Imple
@Override
public List<Employee> findByLastName(String lastName) {
    TypedQuery<Employee> query = entityManager.createQuery("FROM Employee WHERE lastName=:name", Employee.class);
    query.setParameter("name", lastName);
    return query.getResultList();
}
아이템 반환
▶ DAO
Employee findById(int id);▶ DAO Imple
@Override
public Employee findById(int id) {
    return entityManager.find(Employee.class, id);
}
아이템 추가
▶ DAO
void save(Employee employee);▶ DAO Imple
@Override
@Transactional
public void save(Employee student) {
    entityManager.persist(student);
}
아이템 수정
▶ DAO
void update(Employee employee);▶ DAO Imple
@Override
@Transactional
public void update(Employee student) {
    entityManager.merge(student);
}
아이템 삭제
▶ DAO
void delete(int id);▶ DAO Imple
@Override
@Transactional
public void delete(int id) {
    Employee student = entityManager.find(Employee.class, id);
    entityManager.remove(student);
}
완성코드
▶ DAO
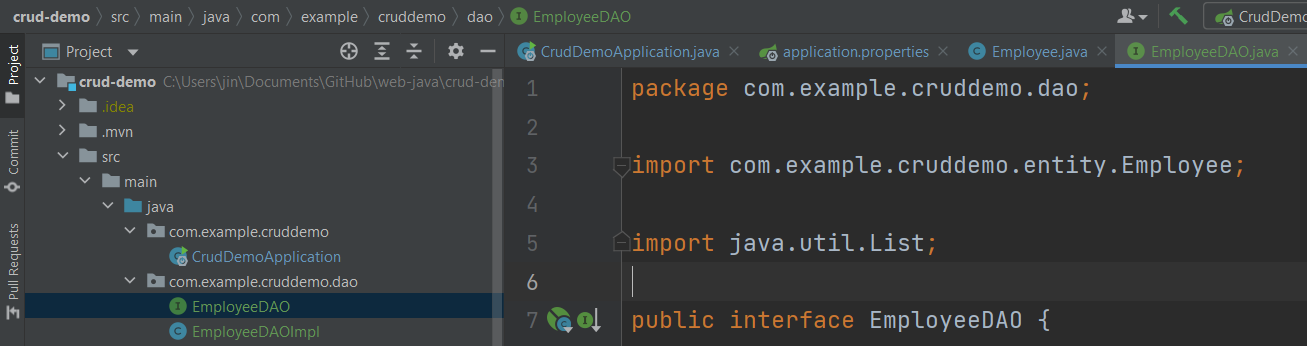
package com.example.cruddemo.dao;

import com.example.cruddemo.entity.Employee;

import java.util.List;

public interface EmployeeDAO {

    List<Employee> findAll();

    List<Employee> findByLastName(String lastName);

    Employee findById(int id);

    void save(Employee employee);

    void update(Employee employee);

    void delete(int id);

    int deleteAll();
}
▶ DAO Imple
package com.example.cruddemo.dao;

import com.example.cruddemo.entity.Employee;
import jakarta.persistence.EntityManager;
import jakarta.persistence.TypedQuery;
import org.springframework.beans.factory.annotation.Autowired;
import org.springframework.stereotype.Repository;
import org.springframework.transaction.annotation.Transactional;

import java.util.List;

@Repository
public class EmployeeDAOImpl implements EmployeeDAO {

    private EntityManager entityManager;

    @Autowired
    public EmployeeDAOImpl(EntityManager entityManager) {
        this.entityManager = entityManager;
    }

    @Override
    @Transactional
    public void save(Employee student) {
        entityManager.persist(student);
    }

    @Override
    public Employee findById(int id) {
        return entityManager.find(Employee.class, id);
    }

    @Override
    public List<Employee> findAll() {
        TypedQuery<Employee> query = entityManager.createQuery("FROM Employee order by lastName", Employee.class);

        return query.getResultList();
    }

    @Override
    public List<Employee> findByLastName(String lastName) {
        TypedQuery<Employee> query = entityManager.createQuery("FROM Employee WHERE lastName=:name", Employee.class);
        query.setParameter("name", lastName);
        return query.getResultList();
    }

    @Override
    @Transactional
    public void update(Employee student) {
        entityManager.merge(student);
    }

    @Override
    @Transactional
    public void delete(int id) {
        Employee student = entityManager.find(Employee.class, id);
        entityManager.remove(student);
    }

    @Override
    @Transactional
    public int deleteAll() {
        int deleted = entityManager.createQuery("DELETE FROM Employee").executeUpdate();
        return deleted;
    }
}
DB 설정
애플리케이션 속성
Let's create a DB first open MySQL and run the script below
spring.datasource.url=jdbc:mysql://localhost:3306/employee_record
spring.datasource.username=<userName>
spring.datasource.password=<password>
#log for SQL
logging.level.org.hibernate.SQL=debug
#log level for SQL
logging.level.org.hibernate.orm.jdbc.bind=debug
#auto create
spring.jpa.hibernate.ddl-auto=create
※ 위 속성 파일에 사용된 'spring.jpa.hibernate.ddl-auto=create' 속성은 애플리케이션 구동 시 자동으로 디비를 생성하는 옵션으로 아래 스크립트를 통해 생성하는 것과 같음
CREATE DATABASE  IF NOT EXISTS `employee_record`;
USE `employee_record`;

DROP TABLE IF EXISTS `employee`;

CREATE TABLE `employee` (
  `id` int NOT NULL AUTO_INCREMENT,
  `first_name`varchar(45) DEFAULT NULL,
  `last_name` varchar(45) DEFAULT NULL,
  `email` varchar(45) DEFAULT NULL,
  PRIMARY KEY (`id`)
) ENGINE=InnoDB AUTO_INCREMENT=1 DEFAULT CHARSET=latin1;
테스트
Open application class and add 'CommnadLineRunner' to test
@Bean
public CommandLineRunner commandLineRunner(EmployeeDAO employeeDAO) {
    return runner -> {
    };
}
▶ Completed Code
package com.example.cruddemo;

import com.example.cruddemo.dao.EmployeeDAO;
import com.example.cruddemo.entity.Employee;
import org.springframework.boot.CommandLineRunner;
import org.springframework.boot.SpringApplication;
import org.springframework.boot.autoconfigure.SpringBootApplication;
import org.springframework.context.annotation.Bean;

import java.util.List;

@SpringBootApplication
public class CrudDemoApplication {

    public static void main(String[] args) {
        SpringApplication.run(CrudDemoApplication.class, args);
    }

    @Bean
    public CommandLineRunner commandLineRunner(EmployeeDAO employeeDAO) {
        return runner -> {
            createEmployee(employeeDAO);
            getEmployee(employeeDAO);
            getEmployees(employeeDAO);
            getEmployeesByLastName(employeeDAO);
            updateEmployee(employeeDAO);
            deleteEmployee(employeeDAO);
            deleteAll(employeeDAO);
        };
    }

    private void deleteAll(EmployeeDAO employeeDAO) {
        int deleted = employeeDAO.deleteAll();
        System.out.println(deleted);
    }

    private void deleteEmployee(EmployeeDAO employeeDAO) {
        int id = 1;
        employeeDAO.delete(1);
    }

    private void updateEmployee(EmployeeDAO employeeDAO) {
        int id = 1;
        Employee employee = employeeDAO.findById(id);
        employee.setFirstName("Stone");
        employeeDAO.update(employee);
        System.out.println(employee);
    }

    private void getEmployeesByLastName(EmployeeDAO employeeDAO) {
        List<Employee> employees = employeeDAO.findByLastName("Pa");
        for (Employee employee : employees) {
            System.out.println(employee);
        }
    }

    private void getEmployees(EmployeeDAO employeeDAO) {
        List<Employee> employees = employeeDAO.findAll();
        for (Employee employee : employees) {
            System.out.println(employee);
        }
    }

    private void getEmployee(EmployeeDAO employeeDAO) {
        System.out.println("employeeDAO.findById(1) = " + employeeDAO.findById(1));
    }

    private void createEmployee(EmployeeDAO employeeDAO) {
        System.out.println("created");
        Employee employee = new Employee("Tim", "Pa", "pa@c.com");

        employeeDAO.save(employee);
    }
}
마이바티스 (mybatis)
2002년에 Clinton Begin에 의해 IBATIS로 개발되었고 MyBatis는 리뉴얼 판, 데이터베이스 SQL과 객체 간의 자동매핑 등 다양한 기능제공
다른 도구들과 가장 큰 차이는 커스텀 쿼리를 사용하지 않고 SQL을 사용한다는 점 (매핑을 XML파일에 패키징하여 애플리케이션 로직에서 SQL구문을 분리)과 경량 프로그램으로 하이버네이트에 비해 빠른 속도를 자랑합니다. 자바뿐 아니라 .NET과 Ruby on Rails에서도 사용 가능.
디펜던시
▶ Spring Web
HTTP요청처리를 위한 어노테이션과 웹 서버 구동을 위해 필요.
<dependency>
    <groupId>org.springframework.boot</groupId>
    <artifactId>spring-boot-starter-web</artifactId>
</dependency>
▶ Mybatis
마이바티스 사용을 위해 필요한 디펜던시
<dependency>
    <groupId>org.mybatis.spring.boot</groupId>
    <artifactId>mybatis-spring-boot-starter</artifactId>
    <version>3.0.2</version>
</dependency>
▶ MySQL Driver
MySQL 사용을 위해 필요한 디펜던시
<dependency>
    <groupId>com.mysql</groupId>
    <artifactId>mysql-connector-j</artifactId>
    <scope>runtime</scope>
</dependency>
작동원리
디펜던시를 추가하면 SQLSessionFactoryBuilder의 builder() 함수를 통해 XML 구성파일이 생성됨. 구성파일에는 데이터 소스 정의, 트랜젝션 매니저 정보, 엔티티 간에 관계를 정의한 매퍼가 존재하며 이는 SQLSessionFactory 인스턴스를 생성
어노테이션
@MapperScan
마이바티스 매퍼 인터페이스 등록. 애플리케이션 클래스나 구성클래스에 추가. 값으로 패키지 명과 그 뒤에 '.mapper' 추가
@MapperScan("<packageName>.mapper")@MappedTypes
매핑할 자바타입 특정. 애플리케이션 클래스나 구성클래스에 추가. 복수를 추가할 경우 어노테이션을 추가할 필요는 없고 하나의 어노테이션에 ','로 구분해서 값으로 추가
@MappedTypes(<entity>.class)@Mapper
특정 클래스를 매퍼 인터페이스로 사용하기 위해 필요
@Mapper@RestController
특정 클래스를 데이터 전송이 가능한 컨트롤러로 사용하기 위해 필요
@Autowired@Autowired
매퍼를 스프링 빈에 등록
@Autowired매퍼 인터페이스 쿼리 명령어
▶ CRUD
@Insert("Insert into person(name) values (#{name})")
public Integer save(Person person);

@Update("Update Person set name= #{name} where personId=#{personId}")
public void updatePerson(Person person);

@Delete("Delete from Person where personId=#{personId}")
public void deletePersonById(Integer personId);

@Select("SELECT person.personId, person.name FROM person
  WHERE person.personId = #{personId}")
Person getPerson(Integer personId);
▶ Results
데이터베이스 칼럼과 상응하는 자바클래스 속성목록
@Select("Select personId, name from Person where personId=#{personId}")
@Results(value = {
  @Result(property = "personId", column = "personId")
    // ...
})
public Person getPersonById(Integer personId);
▶ Result
Results 목록에 포함된 단일 인스턴스
@Results(value = {
  @Result(property = "personId", column = "personId"),
  @Result(property="name", column = "name"),
  @Result(property = "addresses", javaType =List.class)
    // ...
})
public Person getPersonById(Integer personId);
▶ Many
하나의 객체와 다수 객체의 매핑
@Results(value ={
  @Result(property = "addresses", javaType = List.class,
    column = "personId",
    many=@Many(select = "getAddresses"))
})
▶ Mapkey
반환된 목록을 맵으로 변경
@Select("select * from Person")
@MapKey("personId")
Map<Integer, Person> getAllPerson();
▶ Options
설정변경
@Insert("Insert into address (streetAddress, personId)
  values(#{streetAddress}, #{personId})")
@Options(useGeneratedKeys = false, flushCache=true)
public Integer saveAddress(Address address);
동적 SQL
public class MyBatisUtil {

    // ...

    public String getPersonByName(String name){
        return new SQL() {{
            SELECT("*");
            FROM("person");
            WHERE("name like #{name} || '%'");
        }}.toString();
    }
}
마이바티스 설정하기
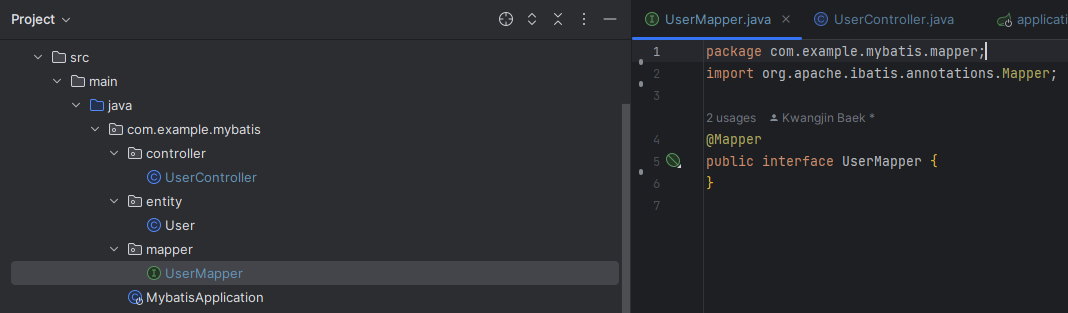
매퍼
자바인터페이스로 함수와 상응하는 SQL구문과 매핑
매퍼 패키지를 만들고 인터페이스 추가 후 @Mapper 어노테이션 표시
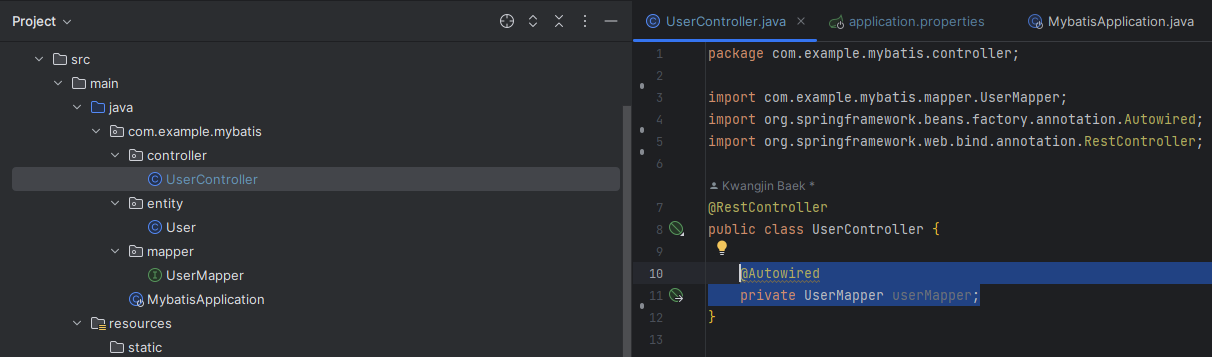
컨트롤러
컨트롤러 패키지 생성 및 컨트롤러 어노테이션 추가 (예제에선 데이터를 응답으로 전송하기 위해 @RestController 사용) 후 위에서 생성한 매퍼를 디펜던시로 주입 (생성자 또는 @Autowired 사용)
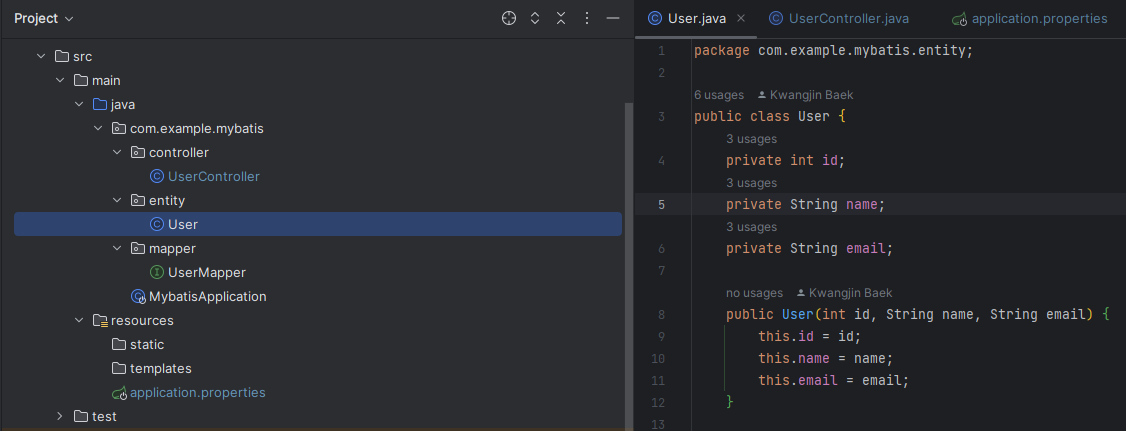
엔티티
엔티티 패키지 생성 및 엔티티 클래스를 추가하고 생성자 및 getter, setter 추가. 생성한 엔티티에 어노테이션 등을 추가할 필요는 없고 자동으로 매핑이 됨
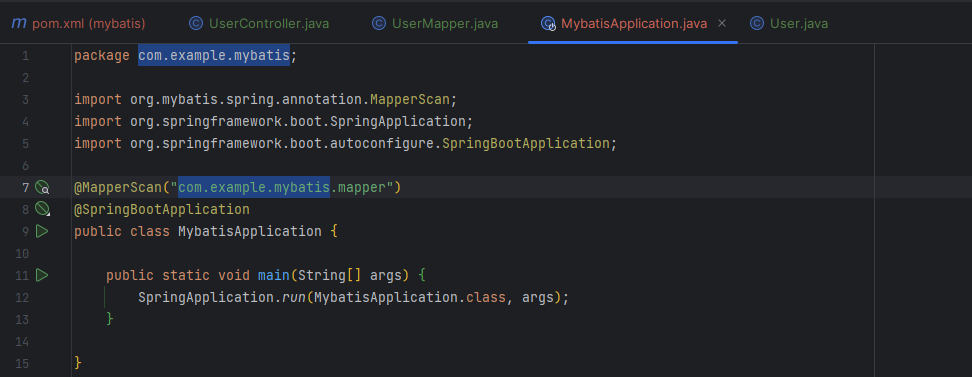
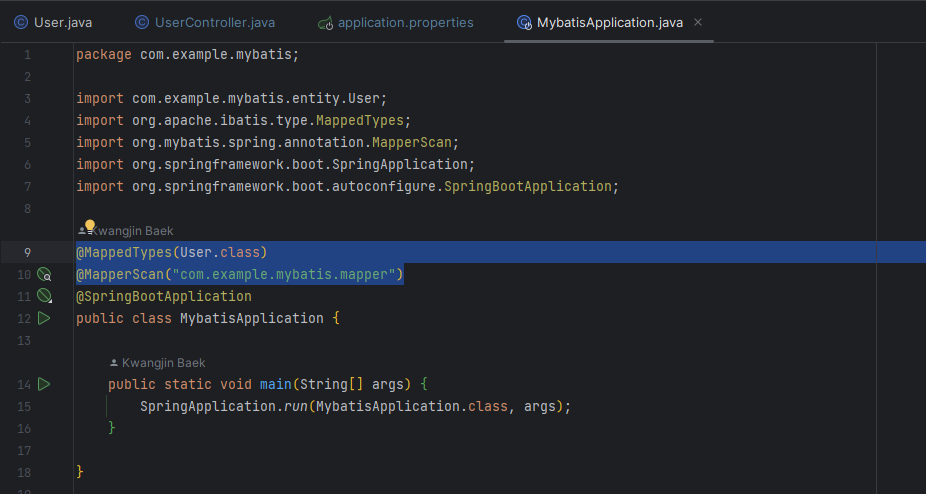
애플리케이션 클래스
애플리케이션 구동 클래스 파일에 @MappedScan 어노테이션 및 @MapperTypes 추가. @MappedScan에는 패키지 명을 포함한 매퍼경로를 @MapperTypes에는 사용할 엔티티 클래스를 각각 값으로 전달
@MappedTypes(User.class)
@MapperScan("com.example.mybatis.mapper")
@SpringBootApplication
public class MybatisApplication {

    public static void main(String[] args) {
        SpringApplication.run(MybatisApplication.class, args);
    }
}
MySQL 데이터베이스 설정
데이터베이스 연결은 모든 데이터베이스 관리 시스템에서 동일하므로 해당 포스팅에서는 MySQL을 통해 연결하는 방법을 보겠습니다.
MySQL에 인스턴스를 생성하고 경로, 유저이름, 비밀번호 확인

인스턴스 안에 데이터베이스 및 테이블 생성 후 테스트를 위한 데이터 입력
CREATE SCHEMA details;
USE details;

DROP TABLE IF EXISTS details.user;
CREATE TABLE  details.user(
   ID int(10) NOT NULL AUTO_INCREMENT,
   NAME varchar(100) NOT NULL,
   EMAIL varchar(255) NOT NULL,
   PRIMARY KEY ( ID )
);

INSERT INTO user
VALUES(1, "TOM", "t@t.com");

SELECT * FROM user;
애플리케이션 속성 설정
application.properties 파일을 열고 아래 코드 삽입 후 저장
spring.datasource.url=jdbc:mysql://<databasePath>
spring.datasource.username=<userName>
spring.datasource.password=<password>
spring.datasource.tomcat.test-while-idle=true
spring.datasource.tomcat.validation-query=SELECT 1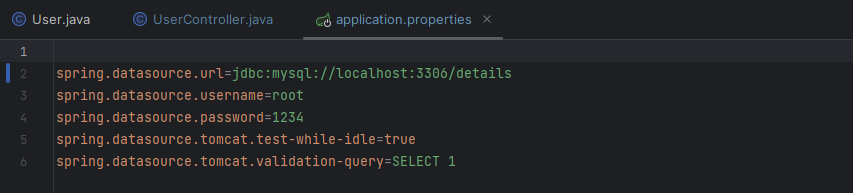
쿼리예제
리스트 반환
▶ 매퍼
@Select("select * from user")
List<User> findAll();
▶ 컨트롤러
@GetMapping("")
public List<User> getAll() {
    return userMapper.findAll();
}
아이템 반환
▶ 매퍼
@Select("select * from user where id = #{id}")
User findOne(int id);
▶ 컨트롤러
@GetMapping("/{id}")
public User getOne(@PathVariable int id) {
    return userMapper.findOne(id);
}
아이템 추가
▶ 매퍼
@Insert("insert into user(name, email) values(#{name}, #{email})")
@SelectKey(statement = "select last_insert_id()", keyProperty = "id", before = false, resultType = Integer.class)
void addOne(User user);
▶ 컨트롤러
@GetMapping("/add")
public List<User> addOne() {
    User user = new User();
    user.setName("Jack");
    user.setEmail("ja@ck.com");
    userMapper.addOne(user);
    return userMapper.findAll();
}
아이템 수정
▶ 매퍼
@Update("update user set name = #{name}, email = #{email} where id = #{id}")
void updateOne(User user);
▶ 컨트롤러
@GetMapping("/update/{id}")
public List<User> updateOne(@PathVariable int id) {
    User user = new User();
    user.setName("Steve");
    user.setEmail("steve@mail.com");
    user.setId(id);
    userMapper.updateOne(user);
    return userMapper.findAll();
}
아이템 삭제
▶ 매퍼
@Delete("delete from user where id = #{id}")
void deleteUser(int id);
▶ 컨트롤러
@GetMapping("/delete/{id}")
public List<User> deleteUser(@PathVariable int id) {
    userMapper.deleteUser(id);
    return userMapper.findAll();
}
완성코드
▶ 매퍼
import com.example.mybatis.entity.User;
import org.apache.ibatis.annotations.*;
import java.util.List;

@Mapper
public interface UserMapper {

    @Select("select * from user")
    List<User> findAll();

    @Insert("insert into user(name, email) values(#{name}, #{email})")
    @SelectKey(statement = "select last_insert_id()", keyProperty = "id", before = false, resultType = Integer.class)
    void addOne(User user);

    @Select("select * from user where id = #{id}")
    User findOne(int id);

    @Update("update user set name = #{name}, email = #{email} where id = #{id}")
    void updateOne(User user);

    @Delete("delete from user where id = #{id}")
    void deleteUser(int id);
}
▶ 컨트롤러
import com.example.mybatis.entity.User;
import com.example.mybatis.mapper.UserMapper;
import org.springframework.beans.factory.annotation.Autowired;
import org.springframework.web.bind.annotation.GetMapping;
import org.springframework.web.bind.annotation.PathVariable;
import org.springframework.web.bind.annotation.RestController;

import java.util.List;

@RestController
public class UserController {

    @Autowired
    private UserMapper userMapper;

    @GetMapping("")
    public List<User> getAll() {
        return userMapper.findAll();
    }

    @GetMapping("/add")
    public List<User> addOne() {
        User user = new User();
        user.setName("Jack");
        user.setEmail("ja@ck.com");
        userMapper.addOne(user);
        return userMapper.findAll();
    }

    @GetMapping("/{id}")
    public User getOne(@PathVariable int id) {
        return userMapper.findOne(id);
    }

    @GetMapping("/update/{id}")
    public List<User> updateOne(@PathVariable int id) {
        User user = new User();
        user.setName("Steve");
        user.setEmail("steve@mail.com");
        user.setId(id);
        userMapper.updateOne(user);
        return userMapper.findAll();
    }

    @GetMapping("/delete/{id}")
    public List<User> deleteUser(@PathVariable int id) {
        userMapper.deleteUser(id);
        return userMapper.findAll();
    }
}
이상으로 데이터베이스 조작도구에 대해 알아보았습니다.
참조
intellij incorrectly saying no beans of type found for autowired repository
I have created a simple unit test but IntelliJ is incorrectly highlighting it red. marking it as an error No beans? As you can see below it passes the test? So it must be Autowired?
stackoverflow.com
▶ 애플리케이션 프로퍼티
Common Application Properties (spring.io)
Common Application Properties
docs.spring.io
'백엔드 > 자바' 카테고리의 다른 글
| 스프링 부트 시큐리티 (0) | 2023.10.01 |
|---|---|
| 스프링 부트 엑츄에이터 (0) | 2023.10.01 |
| 스프링빈 빈 등록 (디펜던시 인젝션) (0) | 2023.08.30 |
| 스프링부트 뷰 템플릿 (타임리프, 제이에스피) (0) | 2023.08.23 |
| 스프링 부트 에이피아이 (0) | 2023.08.20 |


