
스프링 부트에서 폼을 통해 데이터를 전송하는 방법과 제약조건을 설정하는 방법을 살펴보겠습니다.
목차
개별 필드 정보 사용하기
아래처럼 템플릿에서 정보를 전송하면 (name에 사용된 값이 키가 됨)
<form th:action="@{/formSubmit} method="GET">
  <input type="text" name="userName" />
</form>
컨트롤러에서 아래와 같이 두 가지 방법으로 전송된 값을 불러올 수 있습니다.
getParameter 사용하기
@RequestMapping("/resultForm")
public String processForm(HttpServletRequest request, Model model) {
  String name = request.getParameter("userName")
  model.addAttribute("name", name);
  return "formResult";
}
@RequestParam 사용하기
@RequestMapping("/resultForm")
public String processForm(@RequestParam("userName") String name, Model model) {
  model.addAttribute("name", name);
  return "formResult";
}
폼 객체로 사용하기
폼을 제출할 때 setter를 제출된 폼의 정보를 가져올 때 getter를 사용하여 정보를 전송하는 방식입니다.
엔티티 클래스 생성
객체 클래스를 생성하고 기본생성자, getter와 setter 추가
컨트롤러 객체 및 필드 추가, 템플릿과 연결
@GetMapping("/userForm")
public String displayForm(Model model) {
    User user = new User();
    model.addAttribute("user", user);

    return "user-form";
}
폼 생성
템플릿 파일에서 폼을 추가하고 생성된 객체를 전달
<form th:action="@{/showResult}" th:object="${user}" method="POST">
</form>
폼 필드 추가
▶ Text
<input type="text" th:field="*{firstName}">▶ Select
<select th:field="*{gender}">-->
    <option th:value="Male">Male</option>-->
    <option th:value="Female">Female</option>-->
</select>
▶ Radio
<input type="radio" th:field="*{level}" th:value="high">
<input type="radio" th:field="*{level}" th:value="low">
▶ Checkbox
<input type="checkbox" th:field="*{hobbies}" th:value="nap"/>
<input type="checkbox" th:field="*{hobbies}" th:value="excercise"/>
<input type="checkbox" th:field="*{hobbies}" th:value="'going home'"/>
Select나 Radio처럼 다수의 항목이 값으로 사용되는 경우 application.properties 파일에 환경변수를 설정하고 설정된 변수를 폼 필드에 주입하는 것도 가능합니다.
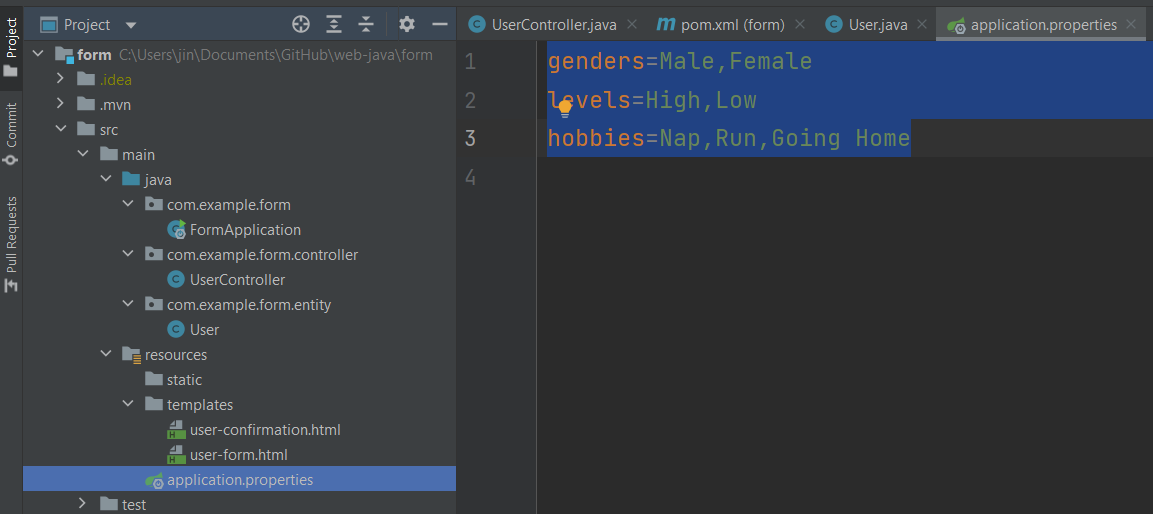
생성된 환경변수를 컨트롤에 추가하고 모델로 전달
@Value("${genders}")
private List<String> genders;

@Value("${levels}")
private List<String> levels;

@Value("${hobbies}")
private List<String> hobbies;

@GetMapping("/userForm")
public String displayForm(Model model) {
    User user = new User();
    model.addAttribute("user", user);

    model.addAttribute("genders", genders);
    model.addAttribute("levels", levels);
    model.addAttribute("hobbies", hobbies);
    return "user-form";
}
▶ Select (환경변수 사용)
<select th:field="*{gender}">
    <option th:each="gender:${genders}" th:value="${gender}" th:text="${gender}"></option>
</select>
▶ Radio (환경변수 사용)
<input type="radio" th:field="*{level}" th:each="level:${levels}" th:value="${level}" th:text="${level}">▶ Checkbox (환경변수 사용)
<input type="checkbox" th:field="*{hobbies}" th:each="hobby:${hobbies}" th:value="${hobby}" th:text="${hobby}"/>폼 데이터 전송하기
▶ 컨트롤러
@PostMapping("/showResult")
public String showResult(@ModelAttribute("user") User user, BindingResult bindingResult, Model model) {
    return "user-confirmation";
}
▶ 폼 결과
<!DOCTYPE html>
<html lang="en" xmlns:th="http://www.thymeleaf.org">
<head>
    <meta charset="UTF-8">
    <title>Title</title>
</head>
<body>
<h3>Result</h3>
<p th:text="${user.firstName}">
<p th:text="${user.gender}">
<p th:text="${user.level}">
<!--<p th:text="${user.hobbies}">-->
<ul>
    <li th:each="hobby:${user.hobbies}" th:text="${hobby}"/>
</ul>
</body>
</html>
완성코드
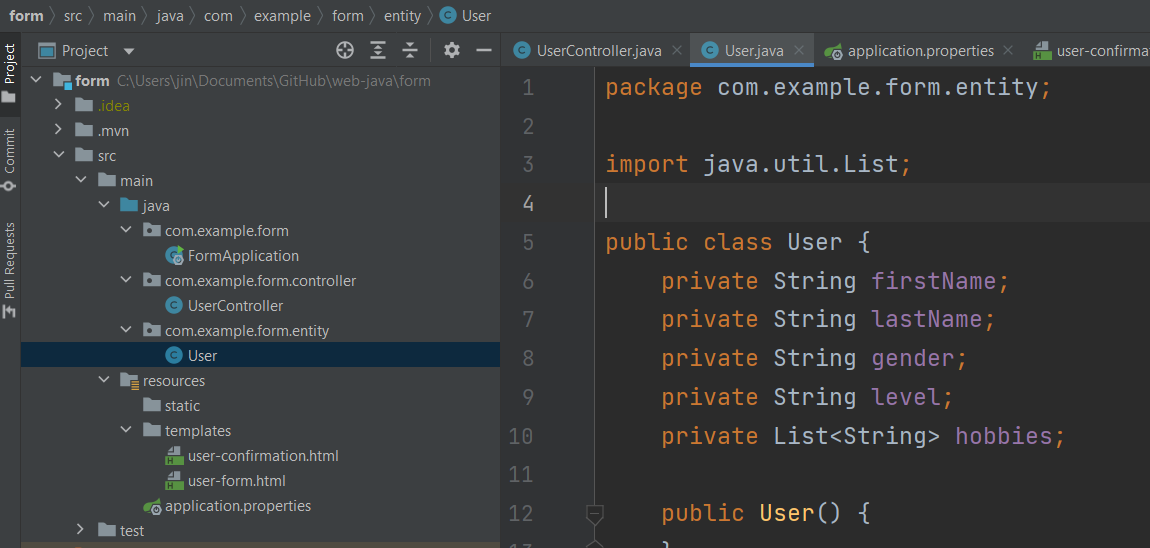
▶ 엔티티
package com.example.form.entity;

import java.util.List;

public class User {
    private String firstName;
    private String lastName;
    private String gender;
    private String level;
    private List<String> hobbies;

    public User() {
    }

    public List<String> getHobbies() {
        return hobbies;
    }

    public void setHobbies(List<String> hobbies) {
        this.hobbies = hobbies;
    }

    public String getLevel() {
        return level;
    }

    public void setLevel(String level) {
        this.level = level;
    }

    public String getGender() {
        return gender;
    }

    public void setGender(String gender) {
        this.gender = gender;
    }

    public String getFirstName() {
        return firstName;
    }

    public void setFirstName(String firstName) {
        this.firstName = firstName;
    }

    public String getLastName() {
        return lastName;
    }

    public void setLastName(String lastName) {
        this.lastName = lastName;
    }
}
▶ 컨트롤러
package com.example.form.controller;

import com.example.form.entity.User;
import org.springframework.beans.factory.annotation.Value;
import org.springframework.stereotype.Controller;
import org.springframework.ui.Model;
import org.springframework.validation.BindingResult;
import org.springframework.web.bind.annotation.GetMapping;
import org.springframework.web.bind.annotation.ModelAttribute;
import org.springframework.web.bind.annotation.PostMapping;

import java.util.List;

@Controller
public class UserController {
    @Value("${genders}")
    private List<String> genders;

    @Value("${levels}")
    private List<String> levels;

    @Value("${hobbies}")
    private List<String> hobbies;

    @GetMapping("/userForm")
    public String displayForm(Model model) {
        User user = new User();
        model.addAttribute("user", user);

        model.addAttribute("genders", genders);
        model.addAttribute("levels", levels);
        model.addAttribute("hobbies", hobbies);
        return "user-form";
    }

    @PostMapping("/showResult")
    public String showResult(@ModelAttribute("user") User user, BindingResult bindingResult, Model model) {
        System.out.println("bindingResult = " + bindingResult.toString());
        return "user-confirmation";
    }
}
▶ 작성 폼
<!DOCTYPE html>
<html lang="en" xmlns:th="http://www.thymeleaf.org">
<head>
    <meta charset="UTF-8">
    <title>Title</title>
</head>
<body>
<h3>Form</h3>
<form th:action="@{/showResult}" th:object="${user}" method="POST">
    <input type="text" th:field="*{firstName}">
    <input type="text" th:field="*{lastName}">
    <!--    <select th:field="*{gender}">-->
    <!--        <option th:value="Male">Male</option>-->
    <!--        <option th:value="Female">Female</option>-->
    <!--    </select>-->
    <select th:field="*{gender}">
        <option th:each="gender:${genders}" th:value="${gender}" th:text="${gender}"></option>
    </select>

    <!--    <input type="radio" th:field="*{level}" th:value="high">-->
    <!--    <input type="radio" th:field="*{level}" th:value="low">-->
    <input type="radio" th:field="*{level}" th:each="level:${levels}" th:value="${level}" th:text="${level}">

    <!--    <input type="checkbox" th:field="*{hobbies}" th:value="nap"/>-->
    <!--    <input type="checkbox" th:field="*{hobbies}" th:value="excercise"/>-->
    <!--    <input type="checkbox" th:field="*{hobbies}" th:value="'going home'"/>-->
    <input type="checkbox" th:field="*{hobbies}" th:each="hobby:${hobbies}" th:value="${hobby}" th:text="${hobby}"/>

    <input type="submit" value="Submit">
</form>
</body>
</html>
▶ 결과 폼
<!DOCTYPE html>
<html lang="en" xmlns:th="http://www.thymeleaf.org">
<head>
    <meta charset="UTF-8">
    <title>Title</title>
</head>
<body>
<h3>Result</h3>
<p th:text="${user.firstName}">
<p th:text="${user.gender}">
<p th:text="${user.level}">
<!--<p th:text="${user.hobbies}">-->
<ul>
    <li th:each="hobby:${user.hobbies}" th:text="${hobby}"/>
</ul>
</body>
</html>
제약조건 설정
디펜던시
제약조건 사용을 위해 아래 디펜던시를 pom.xml파일에 추가
<dependency>
    <groupId>org.springframework.boot</groupId>
    <artifactId>spring-boot-starter-validation</artifactId>
</dependency>
엔티티에 제약조건 설정
디펜던시를 추가하고 반영 후 엔티티에 필드에 사용할 제약조건 추가
▶ 필수
@NotNull(message = "required")
private String lastName;
▶ 사이즈
@Size(min = 1, max = 3, message = "Must be more than 1 and less than 3")
private String lastName;
▶ 숫자 최솟값
@Min(value = 0, message = "over 1")
private int level;
▶ 숫자 최댓값
@Max(value = 10, message = "less than 10")
private int level;
▶ 정규식
@Pattern(regexp = "$[a-zA-Z0-9]{5}", message = "format")
private String postal;
에러 메시지 표시하기
아래 코드를 사용하여 에러메시지 표시도 가능.
th:if="${#fields.hasErrors('<fieldName>')}" th:errors="*{fieldName}"
th:if="${#fields.hasErrors('<fieldName>')}" th:errors="${user.fieldName}"
<form th:action="@{/resultForm}" th:object="${user}" method="POST">
<input type="text" th:field="*{firstName}"/>
<input type="text" th:field="*{lastName}"/>
<span th:if="${#fields.hasErrors('lastName')}" th:errors="*{lastName}"></span>
<input type="text" th:field="*{level}">
<span th:if="${#fields.hasErrors('level')}" th:errors="*{level}"></span>
<input type="text" th:field="*{postal}">
<span th:if="${#fields.hasErrors('postal')}" th:errors="*{postal}"></span>
<input type="text" th:field="*{code}">
<span th:if="${#fields.hasErrors('code')}" th:errors="*{code}"></span>
<input type="submit" value="Submit"/>
</form>커스텀 제약조건 사용하기
제약조건을 담을 패키지를 생성하고 어노테이션 생성
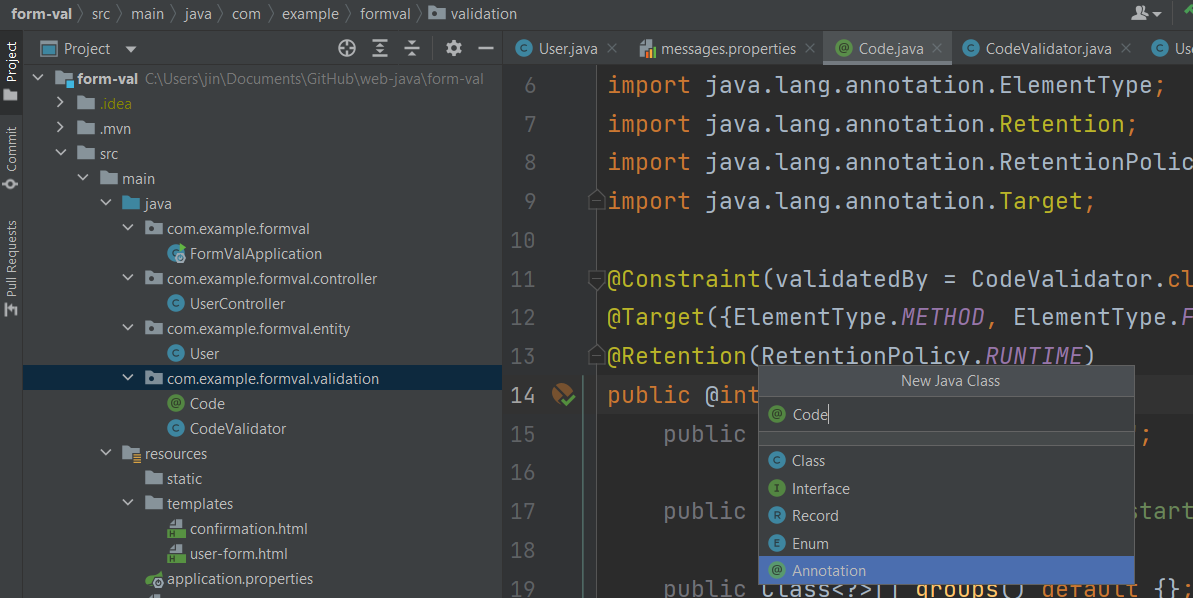
아래 어노테이션 및 필드추가. 이때, @Constraint에 들어가는 클래스는 제약조건 검사 클래스로 생성이 필요함
package com.example.formval.validation;
import jakarta.validation.Constraint;
import jakarta.validation.Payload;
import java.lang.annotation.ElementType;
import java.lang.annotation.Retention;
import java.lang.annotation.RetentionPolicy;
import java.lang.annotation.Target;
@Constraint(validatedBy = CodeValidator.class)
@Target({ElementType.METHOD, ElementType.FIELD})
@Retention(RetentionPolicy.RUNTIME)
public @interface Code {
public String value() default "CD";
public String message() default "start with CD";
public Class<?>[] groups() default {};
public Class<? extends Payload>[] payload() default {};
}위에서 설정한 이름으로 제약조건 검사 클래스 생성하고 아래 인터페이스 상속
ConstraintValidator<<Annotation>, <Type>>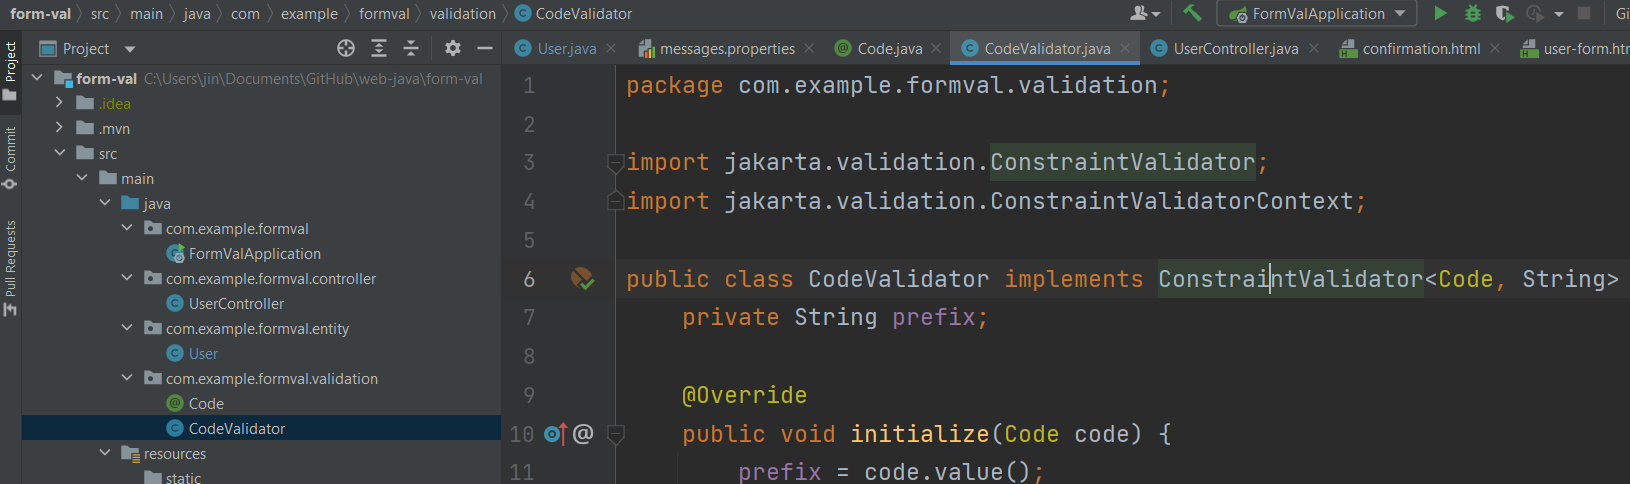
예를 들어, 특정값으로 시작하는 조건을 검사하는 경우 아래와 같이 필드를 통해 유입되는 값을 가져온 뒤 두 번째 메서드에서 이를 검사하는 로직을 작성 후 boolean값 리턴
package com.example.formval.validation;
import jakarta.validation.ConstraintValidator;
import jakarta.validation.ConstraintValidatorContext;
public class CodeValidator implements ConstraintValidator<Code, String> {
private String prefix;
@Override
public void initialize(Code code) {
prefix = code.value();
}
@Override
public boolean isValid(String code, ConstraintValidatorContext constraintValidatorContext) {
boolean result = true;
if (code != null) {
result = code.startsWith(prefix);
}
return result;
}
}▶ 기본값 사용하기
@Code
private String code;▶ 다른 값 사용하기
@Code(value = "CDO")
private String code;제약조건 검사결과는 BindingResult를 통해 확인이 가능한데
@PostMapping("/resultForm")
public String resultForm(@Valid @ModelAttribute("user") User user,
BindingResult bindingResult) {
if (bindingResult.hasErrors()) {
System.out.println(bindingResult.toString());
return "user-form";
} else {
return "confirmation";
}
}codes 배열 안에 값들을 (우측으로 갈수록 범위가 커짐)
messages.properties파일을 생성하여 메시지 변경가능
typeMismatch.user.level=Invalid Number완성코드
▶ 제약조건 어노테이션
package com.example.formval.validation;
import jakarta.validation.Constraint;
import jakarta.validation.Payload;
import java.lang.annotation.ElementType;
import java.lang.annotation.Retention;
import java.lang.annotation.RetentionPolicy;
import java.lang.annotation.Target;
@Constraint(validatedBy = CodeValidator.class)
@Target({ElementType.METHOD, ElementType.FIELD})
@Retention(RetentionPolicy.RUNTIME)
public @interface Code {
public String value() default "CD";
public String message() default "start with CD";
public Class<?>[] groups() default {};
public Class<? extends Payload>[] payload() default {};
}▶ 제약조건 검사클래스
package com.example.formval.validation;
import jakarta.validation.ConstraintValidator;
import jakarta.validation.ConstraintValidatorContext;
public class CodeValidator implements ConstraintValidator<Code, String> {
private String prefix;
@Override
public void initialize(Code code) {
prefix = code.value();
}
@Override
public boolean isValid(String code, ConstraintValidatorContext constraintValidatorContext) {
boolean result = true;
if (code != null) {
result = code.startsWith(prefix);
}
return result;
}
}▶ 엔티티
package com.example.formval.entity;
import com.example.formval.validation.Code;
import jakarta.validation.constraints.*;
public class User {
private String firstName;
@NotNull(message = "required")
@Size(min = 1, max = 3, message = "Must be more than 1 and less than 3")
private String lastName;
@Min(value = 0, message = "over 1")
@Max(value = 10, message = "less than 10")
private int level;
@NotNull
private String levelMen;
@Pattern(regexp = "$[a-zA-Z0-9]{5}", message = "format")
private String postal;
@Code(value = "CDO")
private String code;
public User() {
}
public int getLevel() {
return level;
}
public void setLevel(int level) {
this.level = level;
}
public String getFirstName() {
return firstName;
}
public void setFirstName(String firstName) {
this.firstName = firstName;
}
public String getLastName() {
return lastName;
}
public void setLastName(String lastName) {
this.lastName = lastName;
}
public String getLevelMen() {
return levelMen;
}
public void setLevelMen(String levelMen) {
this.levelMen = levelMen;
}
public String getPostal() {
return postal;
}
public void setPostal(String postal) {
this.postal = postal;
}
public String getCode() {
return code;
}
public void setCode(String code) {
this.code = code;
}
}▶ 컨트롤러
package com.example.formval.controller;
import com.example.formval.entity.User;
import jakarta.validation.Valid;
import org.springframework.beans.propertyeditors.StringTrimmerEditor;
import org.springframework.stereotype.Controller;
import org.springframework.ui.Model;
import org.springframework.validation.BindingResult;
import org.springframework.web.bind.WebDataBinder;
import org.springframework.web.bind.annotation.GetMapping;
import org.springframework.web.bind.annotation.InitBinder;
import org.springframework.web.bind.annotation.ModelAttribute;
import org.springframework.web.bind.annotation.PostMapping;
@Controller
public class UserController {
@InitBinder
public void initBinder(WebDataBinder dataBinder) {
StringTrimmerEditor stringTrimmerEditor = new StringTrimmerEditor(true);
dataBinder.registerCustomEditor(String.class, stringTrimmerEditor);
}
@GetMapping("/")
public String showForm(Model model) {
model.addAttribute("user", new User());
return "user-form";
}
@PostMapping("/resultForm")
public String resultForm(
@Valid @ModelAttribute("user") User user,
BindingResult bindingResult) {
if (bindingResult.hasErrors()) {
System.out.println(bindingResult.toString());
return "user-form";
} else {
return "confirmation";
}
}
}▶ 작성 폼
<!DOCTYPE html>
<html lang="en" xmlns:th="http://www.thymeleaf.org">
<head>
<meta charset="UTF-8">
<title>Title</title>
</head>
<body>
<form th:action="@{/resultForm}" th:object="${user}" method="POST">
    <input type="text" th:field="*{firstName}"/>
    <input type="text" th:field="*{lastName}"/>
    <span th:if="${#fields.hasErrors('lastName')}" th:errors="*{lastName}"></span>

    <input type="text" th:field="*{level}">
    <span th:if="${#fields.hasErrors('level')}" th:errors="*{level}"></span>

    <input type="text" th:field="*{postal}">
    <span th:if="${#fields.hasErrors('postal')}" th:errors="*{postal}"></span>

    <input type="text" th:field="*{code}">
    <span th:if="${#fields.hasErrors('code')}" th:errors="*{code}"></span>

    <input type="submit" value="Submit"/>
</form>
</body>
</html>▶ 결과 폼
<!DOCTYPE html>
<html lang="en" xmlns:th="http://www.thymeleaf.org">
<head>
    <meta charset="UTF-8">
    <title>Title</title>
</head>
<body>
<p th:text="${user.firstName + ' ' + user.lastName + ' ' + user.level + ' ' + user.postal + ' ' + user.code"/>
</body>
</html>
이상으로 스프링 부트 폼에 대해서 알아보았습니다.
참조
Jakarta Bean Validation - Home
Jakarta Bean Validation - Home
Jakarta Bean Validation is a Java specification which lets you express constraints on object models via annotations lets you write custom constraints in an extensible way provides the APIs to validate objects and object graphs provides the APIs to validate
beanvalidation.org
'백엔드 > 자바' 카테고리의 다른 글
| 클래스 (0) | 2023.12.28 |
|---|---|
| 스위치 (0) | 2023.12.26 |
| 롬복 (0) | 2023.10.07 |
| 스프링 부트 시큐리티 (0) | 2023.10.01 |
| 스프링 부트 엑츄에이터 (0) | 2023.10.01 |


