Angular reactive forms uses observables to manage input data in a stream. Unlike the template-driven forms, reactive forms handles the data synchronously and uses operators to manipulate data as a copy but do not change the orginal data
Let's see how to use it
List of Contents
Implementation
First, we need the ReactiveForms module.
//scr/app/app.module.ts

import { NgModule } from '@angular/core';
import { ReactiveFormsModule } from '@angular/forms';
import { BrowserModule } from '@angular/platform-browser';

import { AppRoutingModule } from './app-routing.module';
import { AppComponent } from './app.component';

@NgModule({
  declarations: [
    AppComponent
  ],
  imports: [
    BrowserModule,
    AppRoutingModule,
    ReactiveFormsModule // forms module
  ],
  providers: [],
  bootstrap: [AppComponent]
})
export class AppModule { }
※ The reason why we need to add module in the module file is to use them in a template file. Without adding the module in the module file you won't be able to use binding

Next, add a form in a template file
<!-- form.component.html -->

<form>
  <div>
    <input type="text">
  </div>

  <div>
    <input type="text">
  </div>

  <div>
    <input type="email">
  </div>

  <button>Submit</button>
</form>
There are two ways to used reactive forms: using form control only and using form group with form control.
Using Form Control Only
Instantiate the controls
// format.component.ts

import { Component, OnInit } from '@angular/core';
import { FormControl } from '@angular/forms';

@Component({
  selector: 'app-form',
  templateUrl: './form.component.html',
  styleUrls: ['./form.component.css']
})
export class FormComponent implements OnInit {
  title = new FormControl // control
  content = new FormControl // control
  email = new FormControl // control

  constructor() { }

  ngOnInit(): void {
  }
}
Link the controls created to the template fileds
<!-- form.component.html -->

<form>
  <div>
    <input type="text" [formControl]="title">
  </div>

  <div>
    <input type="text" [formControl]="content">
  </div>

  <div>
    <input type="email" [formControl]="email">
  </div>

  <button>Submit</button>
</form>
Now, let's check by adding a submit event. Add the event to the form (Reactive form doesn't support overriding the default form submit behavior so pass an event as a parameter)
<!-- form.component.html -->

<form (submit)="onSubmit($event)">
  <div>
    <input type="text" [formControl]="title">
  </div>

  <div>
    <input type="text" [formControl]="content">
  </div>

  <div>
    <input type="email" [formControl]="email">
  </div>

  <button>Submit</button>
</form>
Now, add the function in the class file
// format.component.ts

import { Component, OnInit } from '@angular/core';
import { FormControl } from '@angular/forms';

@Component({
  selector: 'app-form',
  templateUrl: './form.component.html',
  styleUrls: ['./form.component.css']
})
export class FormComponent implements OnInit {
  title = new FormControl
  content = new FormControl
  email = new FormControl

  constructor() { }

  ngOnInit(): void {
  }

  onSubmit(e:Event) {
    e.preventDefault()
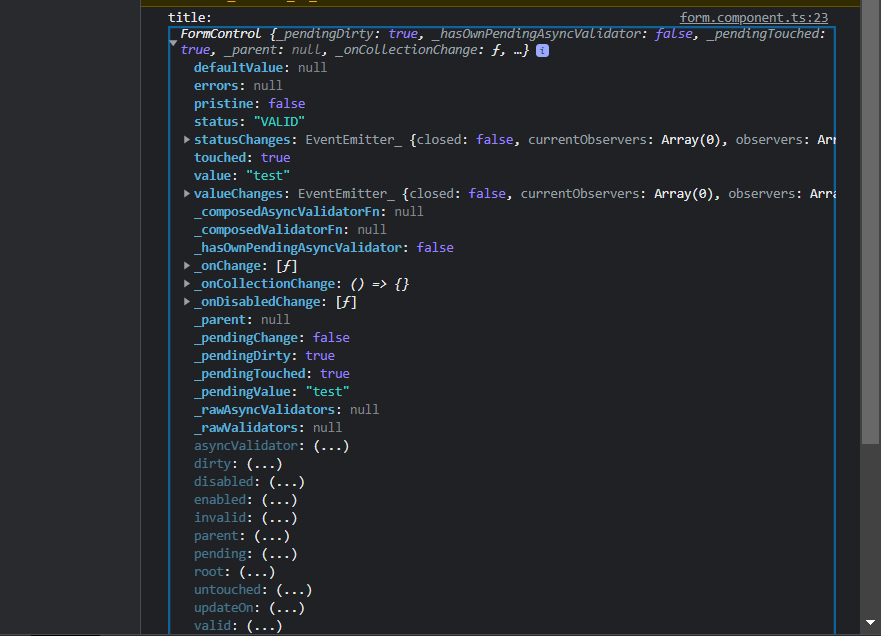
    console.log('title: ', this.title)
    console.log('content: ', this.content)
    console.log('email: ', this.email)
  }
}
Sutmit the form then you will see the data submitted


Using Form Group with Form Control
Instead of managing the fields separatly, you can use form group to group the fields and manage them in one form object. Instantiate a form group and append each field in an object
// format.component.ts

import { Component, OnInit } from '@angular/core';
import { FormControl, FormGroup } from '@angular/forms';

@Component({
  selector: 'app-form',
  templateUrl: './form.component.html',
  styleUrls: ['./form.component.css']
})
export class FormComponent implements OnInit {
  form = new FormGroup({
    title : new FormControl,
    content : new FormControl,
    email : new FormControl
  })

  constructor() { }

  ngOnInit(): void {
  }

  onSubmit(e:Event) {
    e.preventDefault()
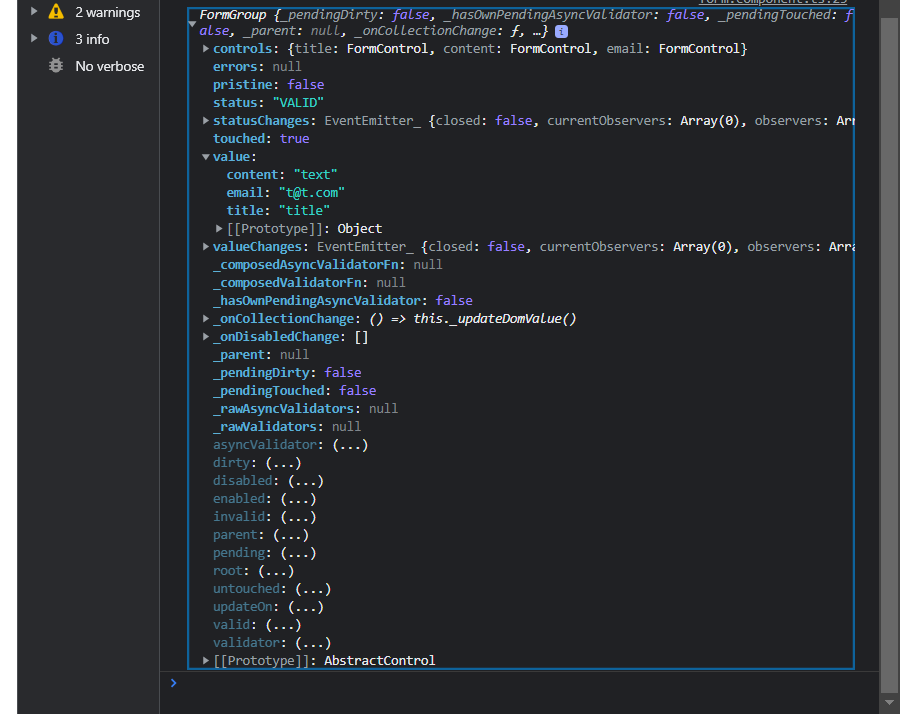
    console.log(this.form)
  }
}
Next, use 'formControlName' to link the controls and the fields in the template
<!-- form.component.html -->

<form (submit)="onSubmit($event)" [formGroup]="form">
  <div>
    <input type="text" formControlName="title">
  </div>

  <div>
    <input type="text" formControlName="content">
  </div>

  <div>
    <input type="email" formControlName="email">
  </div>

  <button>Submit</button>
</form>
Submit the form again and you will see now it is group in one object


Validations
Unlike template-driven forms validations in the reactive forms are added in the class file using 'Validators' module. Let's add 'required' first.
The first parameter of the form control is the default value and the second is for the validation. Validaions are added as an object with an array of conditions
// format.component.ts

import { Component, OnInit } from '@angular/core';
import { FormControl, FormGroup, Validators } from '@angular/forms';

@Component({
  selector: 'app-form',
  templateUrl: './form.component.html',
  styleUrls: ['./form.component.css']
})
export class FormComponent implements OnInit {
  form = new FormGroup({
    title : new FormControl('', {validators:[Validators.required]}),
    content : new FormControl,
    email : new FormControl
  })

  constructor() { }

  ngOnInit(): void {
  }

  onSubmit(e:Event) {
    e.preventDefault()
    console.log(this.form)
  }
}
When you submit the form without filling in the field that you added validation 'required', the status will show 'INVALID'

We can use this feature to create interactive forms. Let's see how we can do that
Add validations in the class file as below
// format.component.ts

import { Component, OnInit } from '@angular/core';
import { FormControl, FormGroup, Validators } from '@angular/forms';

@Component({
  selector: 'app-form',
  templateUrl: './form.component.html',
  styleUrls: ['./form.component.css']
})
export class FormComponent implements OnInit {
  form = new FormGroup({
    title : new FormControl('', {validators:[Validators.required]}),
    content : new FormControl('', {validators:[Validators.minLength(10)]}),
    email : new FormControl('', {validators:[
    Validators.pattern('^[a-zA-Z0-9]+(?:\.[a-zA-Z0-9]+)*@[a-zA-Z0-9]+(?:\.[a-zA-Z0-9]+)*$')
    ]})
  })

  constructor() { }

  ngOnInit(): void {
  }

  onSubmit(e:Event) {
    e.preventDefault()
    console.log(this.form)
  }
}
Add a text tag to show the error message when it is invalid using 'ng-if'
<!-- form.component.html -->

<form (submit)="onSubmit($event)" [formGroup]="form">
  <div>
    <input type="text" formControlName="title">
    <p *ngIf="form.touched && form.get('title')?.invalid">Title Required</p>
  </div>

  <div>
    <input type="text" formControlName="content">
    <p *ngIf="form.touched && form.get('content')?.invalid">Minimum 10 characters</p>
  </div>

  <div>
    <input type="email" formControlName="email">
    <p *ngIf="form.touched && form.get('email')?.invalid">Wrong Format</p>
  </div>

  <button>Submit</button>
</form>
I have added 'touched' to show the error message only after a user clicked the input and did not meet the requirements for a better UX
Again submit the form and you will see that it is working!

To handle the form depending on the status of the form (whether it is valid of not), add the code below
// format.component.ts

import { Component, OnInit } from '@angular/core';
import { FormControl, FormGroup, Validators } from '@angular/forms';

@Component({
  selector: 'app-form',
  templateUrl: './form.component.html',
  styleUrls: ['./form.component.css']
})
export class FormComponent implements OnInit {
  form = new FormGroup({
    title : new FormControl('', {validators:[Validators.required]}),
    content : new FormControl('', {validators:[Validators.minLength(10)]}),
    email : new FormControl('', {validators:[Validators.pattern('^[a-zA-Z0-9]+(?:\.[a-zA-Z0-9]+)*@[a-zA-Z0-9]+(?:\.[a-zA-Z0-9]+)*$')]})
  })

  constructor() { }

  ngOnInit(): void {
  }

  onSubmit(e:Event) {
    e.preventDefault()
    // handles the form depending on the status
    if(this.form.valid) {
      console.log(this.form)
    }
    this.form.reset() // clears the form
  }
}
Form Builder
Angular also provides a form builder service to make the process of form creation less painful. To use the service, add the service as a parameter in the constructor
// format.component.ts

import { Component, OnInit } from '@angular/core';
import {
  FormBuilder,
  FormControl,
  FormGroup,
  Validators,
} from '@angular/forms';

@Component({
  selector: 'app-form',
  templateUrl: './form.component.html',
  styleUrls: ['./form.component.css'],
})
export class FormComponent implements OnInit {
  formBuilder = this.fb.group({
    title: ['', Validators.required],
    content: ['', Validators.minLength(10)],
    email: [
      '',
      Validators.pattern(
        '^[a-zA-Z0-9]+(?:.[a-zA-Z0-9]+)*@[a-zA-Z0-9]+(?:.[a-zA-Z0-9]+)*$'
      ),
    ],
  });
  constructor(private fb: FormBuilder) {}

  ngOnInit(): void {}

  onSubmit(e: Event) {
    e.preventDefault();
    if (this.form.valid) {
      console.log(this.form);
    }
    this.form.reset();
  }
}
Other Features
Two-way binding
Data is shared between the template and the class so when you use 'value' attribute in the template you can see the updated data right away
<!-- form.component.html -->

<form (submit)="onSubmit($event)">
  <div>
    <input type="text" [formControl]="title">
  </div>

  <p>{{title.value}}</p>

  <div>
    <input type="text" [formControl]="content">
  </div>

  <div>
    <input type="email" [formControl]="email">
  </div>

  <button>Submit</button>
</form>
Changing Values
It is also possible to change the value in the class file using the functions below
.setValue().patchValue()To test, I have added 'setValue' at the end of the form
// format.component.ts

import { Component, OnInit } from '@angular/core';
import { FormControl } from '@angular/forms';

@Component({
  selector: 'app-form',
  templateUrl: './form.component.html',
  styleUrls: ['./form.component.css']
})
export class FormComponent implements OnInit {
  title = new FormControl
  content = new FormControl
  email = new FormControl

  constructor() { }

  ngOnInit(): void {
  }

  onSubmit(e:Event) {
    e.preventDefault()
    console.log('title: ', this.title)
    console.log('content: ', this.content)
    console.log('email: ', this.email)
    this.title.setValue('override') // 값 설정
  }
}
We can see the the value 'override' is the end value whatever is typed in the form

In this writing, we have seen Angular reactive form.
References
Angular
angular.io
'Frontend > Angular' 카테고리의 다른 글
| Lazy Loading (0) | 2023.03.20 |
|---|---|
| Angular - How to Use HTTPS in Development (1) | 2023.03.12 |
| Angular Forms - Template-driven form (0) | 2023.03.10 |
| Angular Material - Adding Modules (module list) (0) | 2023.03.06 |
| Angular Modal (0) | 2023.02.27 |


